 Calisthenics 2
Div Positioning and Z-index (In-Class Exercise)
This instructions page contain the following:
- Part 1 - Planning and Preparation
- Part 2 - Div Tag Structure and the Box Model
- Part 3 - Add Content
- Part 4 - CSS, Tag, Class, and ID Selectors
- Part 5 - Upload
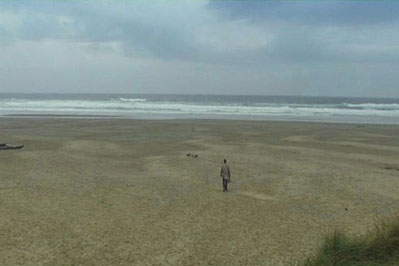
Relative and absolute positioning divs and stacking divs using the CSS z-index property. Use the image below if you don't have one of a similar size.

Part 1: Planning and Preparation
- Create a folder under your cas111d folder called calisthenics, if you have not already done this.
- Create a sub-folder under calisthenics called cal2
- Create a new file called cal02.html and save it in the cal2 folder.
- Create a sub-folder in cal2 called assets.
- Save the image above and put it inside the assets folder.
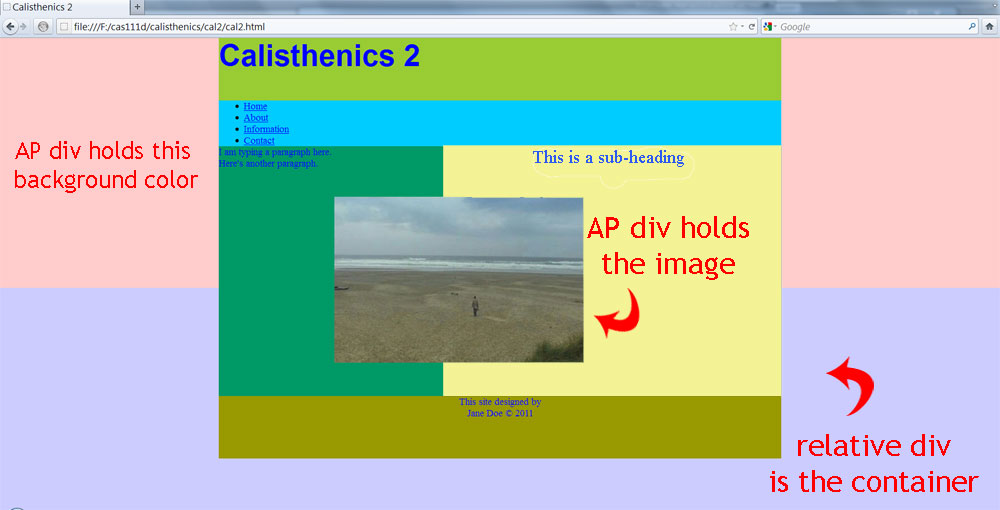
- Follow along with the instructor to construct a fixed width Web page using a relative div as the container and a nested AP div and a background AP div. The final page should look similar to this image:

Part 2: Div Tag Structure and the Box Model
In this part, you will:
- learn about the Box Model, fixed width layout and liquid layout
- put HTML code for div tags in Dreamweaver Code view
- nest div tags in other div tags
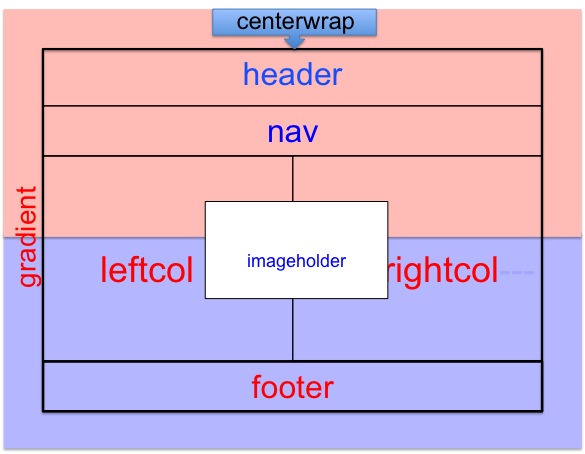
You'll be creating a div structure in Code view based on the wireframe layout (below). Note that all the divs are nested inside the container div called "centerwrap".

- Type in a gradient div called "gradient". In the Code view, the tags would look like this: <div id="gradient"></div>
- Type in a container div called "centerwrap".
- Inside div#centerwrap, place (i.e., nest) the following divs (these are their IDs):
- header
- nav
- leftcol
- rightcol
- footer
- imageholder
Part 3: Add Content
You'll now be adding content (text and images) into the div tags you created in Part 2 as shown in the sample image from Part 1. You will be switching back-and-forth from Code view and Design view.
- Inside div#header, create a heading 1 with the text "Calisthenics 2" (no quotes).
- Inside div#nav, create an unordered list with the following:
- Home
- About
- Information
- Contact
- Create null links for the unordered list inside div#nav. In the Code view, the tag would look like this: <a href="#">Home</a>
- Inside div#leftcol, create a paragraph with the text "I'm typing a paragraph here" (no quotes). Then create another paragraph with the text "Here's another paragraph" (no quotes).
- Inside div#rightcol, create a heading 2 with the text "This is a sub-heading" (no quotes).
- Inside div#footer, create a paragraph with the text "This site designed by" (no quotes).
- Insert a break tag <br /> (Shift-enter in Dreamweaver), then enter the text "Your Name © 20xx" (no quotes, replace Your Name with your actual name and xx with the current year).
- Inside div#imageholder, insert the picture beach_lg.jpg located in the assets folder. Add an alternative tag "A guy walking on the beach" (no quotes).
Part 4: CSS, tag, class and ID selectors
You use CSS Style to style the HTML tags you created in Part 2 and 3. You will also:
- center content in the Web browser window in a fixed width layout
- learn the difference between absolute and relative positioning
- create two columns
- use the CSS properties float and clear
- Export the CSS to a file called cal02.css
- Save cal02.css into a subfolder called assets.
Instructor Note:
We are going to create 3 different selectors:
1. Tag selectors
* - margin: 0px
body - background-color: #ccf, font-size: 100%
h1, h2, and p - font-type, font-size (em), color
2. ID selectors
div in the html from top to bottom
#gradient
#centerwrap
3. Class selector
.copyright
- Using the CSS Styles panel - All button, create the following New CSS Rules (plus sign):
- A tag selector * (margin 0px).
- A tag selector body (font-size 100%, background-color: #ccf).
- A tag selector h1 (Arial family, font-size: 2em, font color #00f).
- A tag selector h2 (Arial family, font-size: 1.5em, font color #00f, center-aligned).
- A tag selector p (Times New Roman family, font-size: 1em, font color #00f)
Instructor Note:
Static (default) and Relative positioning:
-divs recognize each other.
-float to create columns.
-margin can be used.
Absolute and Fixed positioning:
-divs don't recognize each other.
-can't float.
-margin can't be used.
- Using the CSS Styles panel - All button, create the following New CSS Rules (plus sign):
- An ID selector #gradient (background color #fcc, absolute positioning, width 100%, height 300px, top and left placement 0, z-index 10).
- An ID selector #centerwrap (background color #093, width 900px, right and left margin auto, relative positioning, z-index 20).
- An ID selector #header (background color #9f3, height 100px).
- An ID selector #nav (background color #0ff).
- An ID selector #leftcol (width 400px, float left).
- An ID selector #rightcol (background color #ff9, width 500px, height 400px, float right).
- An ID selector #footer (background color #c96, height 100px, clear both).
- An ID selector #imageholder (absolute positioning, top and left placement 50px, z-index 30).
- In Design view, select div#imageholder and drag it to the middle between the div#leftcol and div#rightcol, just below the text on the leftcol.
Instructor Note:
Make sure it's the div#imageholder that you're selecting and not the image <img> itself. See which one from the Status bar, above the Properties panel. - Using the CSS Styles panel - All button, create the following New CSS Rules (plus sign):
- A class selector .copyright (text align center).
- Apply copyright to the paragraph in div#footer.
- Export the internal Cascading Style Sheet (Move CSS Rules...) of cal02.html to an external file with the name cal02.css. Save it in the cal2/assets folder.
- Delete the left-over internal (embedded) style tag in the Code view or delete <style> in the CSS Styles panel.
- Save both files cal02.html and cal02.css (File --> Save All).
Instructor Note:
Do not use a shortcut Ctrl-s to save your files. Even though both cal02.html and cal02.css may look like they're together, but they are actually two separate files that you have to save individually. If you click on File --> Save All, Dreamweaver will save both files automatically.
Step #6 where you save your CSS to cal02.css will not actually save the file until you click to save cal02.css file itself.
Part 5: Uploading
- Upload the entire cal2 folder to your username folder on the SWS using the Site Definition we created in class. The cal2 folder should contain a sub-folder called assets that will contain beach_lg.jpg and cal02.css files.
- Mail your instructor using a subject like CAS 111d Calisthenics 2 Your Name
Instructor Note:
As you should be in the habit of doing, be sure to use a browser (or more than one browser) to check your Web pages on the SWS to ensure everything works properly.