 Div Positioning Example
Div Positioning and Z-index (In-Class Exercise)
This instructions page contain the following:
- Part 1 - Planning and Preparation
- Part 2 - Div Tag Structure and the Box Model
- Part 3 - Add Content
- Part 4 - CSS, Tag, Class, and ID Selectors
- Part 5 - Upload
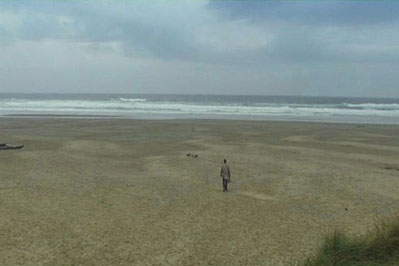
Relative and absolute positioning divs and stacking divs using the CSS z-index property. Use the image below if you don't have one of a similar size.

Part 1: Planning and Preparation
- Create a folder under your cas111d folder called examples, if you have not already done this.
- Create a sub-folder under calisthenics called layout
- Create a new file called div-position.html and save it in the layout folder.
- Create a sub-folder in layout called assets.
- Save the image above and put it inside the assets folder.
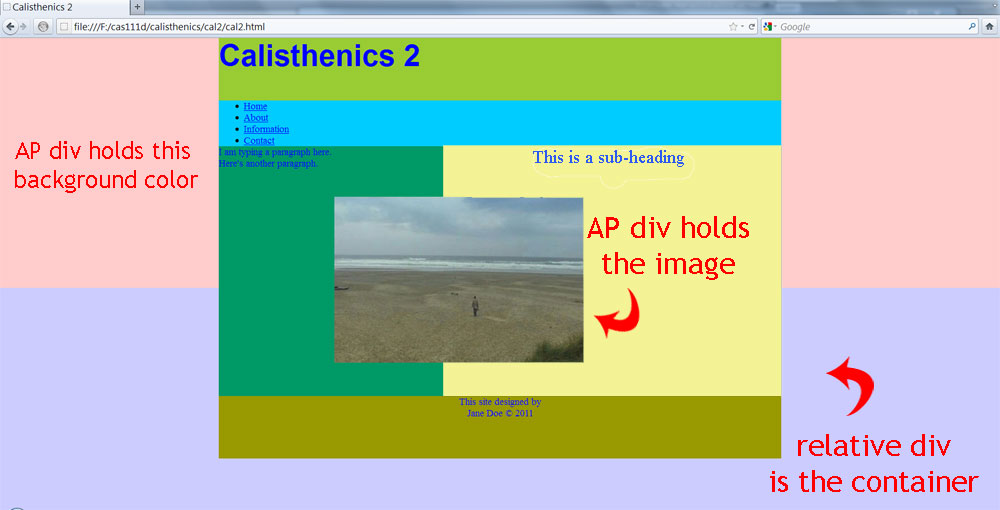
- Follow along with the instructor to construct a fixed width Web page using a relative div as the container and a nested AP div and a background AP div. The final page should look similar to this image:

Part 2: Div Tag Structure and the Box Model
In this part, you will:
- learn about the Box Model, fixed width layout and liquid layout
- put HTML code for div tags in Dreamweaver Code view
- nest div tags in other div tags
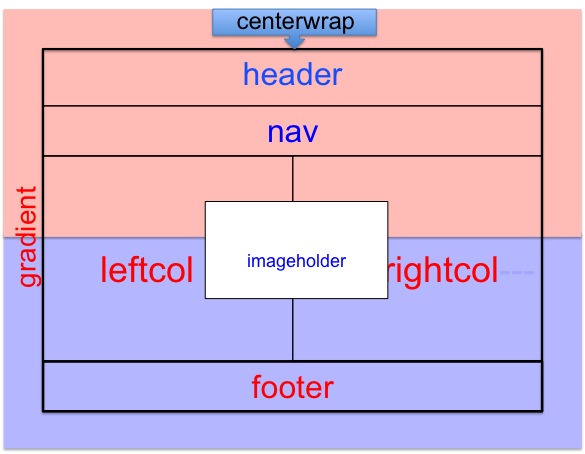
You'll be creating a div structure in Code view based on the wireframe layout (below). Note that all the divs are nested inside the container div called "centerwrap".

- Type in a gradient div called "gradient". In the Code view, the tags would look like this: <div id="gradient"></div>
- Type in a container div called "centerwrap".
- Inside div#centerwrap, place (i.e., nest) the following divs (these are their IDs):
- header
- nav
- leftcol
- rightcol
- footer
- imageholder
Part 3: Add Content
You'll now be adding content (text and images) into the div tags you created in Part 2 as shown in the sample image from Part 1. You will be switching back-and-forth from Code view and Design view.
- Inside div#header, create a heading 1 with the text "Calisthenics 2" (no quotes).
- Inside div#nav, create an unordered list with the following:
- Home
- About
- Information
- Contact
- Create null links for the unordered list inside div#nav. In the Code view, the tag would look like this: <a href="#">Home</a>
- Inside div#leftcol, create a paragraph with the text "I'm typing a paragraph here" (no quotes). Then create another paragraph with the text "Here's another paragraph" (no quotes).
- Inside div#rightcol, create a heading 2 with the text "This is a sub-heading" (no quotes).
- Inside div#footer, create a paragraph with the text "This site designed by" (no quotes).
- Insert a break tag <br /> (Shift-enter in Dreamweaver), then enter the text "Your Name © 20xx" (no quotes, replace Your Name with your actual name and xx with the current year).
- Inside div#imageholder, insert the picture beach_lg.jpg located in the assets folder. Add an alternative tag "A guy walking on the beach" (no quotes).
Part 4: CSS, tag, class and ID selectors
You use CSS Style to style the HTML tags you created in Part 2 and 3. You will also:
- center content in the Web browser window in a fixed width layout
- learn the difference between absolute and relative positioning
- create two columns
- use the CSS properties float and clear
- Export the CSS to a file called div-position.css
- Save div-position.css into a subfolder called assets.
Instructor Note:
We are going to create 3 different selectors:
1. Tag selectors
* - margin: 0px
body - background-color: #ccf, font-size: 100%
h1, h2, and p - font-type, font-size (em), color
2. ID selectors
div in the html from top to bottom
#gradient
#centerwrap
3. Class selector
.copyright
- Using the CSS Styles panel - All button, create the following New CSS Rules (plus sign):
- A tag selector * (margin 0px).
- A tag selector body (font-size 100%, background-color: #ccf).
- A tag selector h1 (Arial family, font-size: 2em, font color #00f).
- A tag selector h2 (Arial family, font-size: 1.5em, font color #00f, center-aligned).
- A tag selector p (Times New Roman family, font-size: 1em, font color #00f)
Instructor Note:
Static (default) and Relative positioning:
-divs recognize each other.
-float to create columns.
-margin can be used.
Absolute and Fixed positioning:
-divs don't recognize each other.
-can't float.
-margin can't be used.
- Using the CSS Styles panel - All button, create the following New CSS Rules (plus sign):
- An ID selector #gradient (background color #fcc, absolute positioning, width 100%, height 300px, top and left placement 0, z-index 10).
- An ID selector #centerwrap (background color #093, width 900px, right and left margin auto, relative positioning, z-index 20).
- An ID selector #header (background color #9f3, height 100px).
- An ID selector #nav (background color #0ff).
- An ID selector #leftcol (width 400px, float left).
- An ID selector #rightcol (background color #ff9, width 500px, height 400px, float right).
- An ID selector #footer (background color #c96, height 100px, clear both).
- An ID selector #imageholder (absolute positioning, top and left placement 50px, z-index 30).
- In Design view, select div#imageholder and drag it to the middle between the div#leftcol and div#rightcol, just below the text on the leftcol.
Instructor Note:
Make sure it's the div#imageholder that you're selecting and not the image <img> itself. See which one from the Status bar, above the Properties panel. - Using the CSS Styles panel - All button, create the following New CSS Rules (plus sign):
- A class selector .copyright (text align center).
- Apply copyright to the paragraph in div#footer.
- Export the internal Cascading Style Sheet (Move CSS Rules...) of div-position.html to an external file with the name div-position.css. Save it in the cal2/assets folder.
- Delete the left-over internal (embedded) style tag in the Code view or delete <style> in the CSS Styles panel.
- Save both files div-position.html and div-position.css (File --> Save All).
Instructor Note:
Do not use a shortcut Ctrl-s to save your files. Even though both div-position.html and div-position.css may look like they're together, but they are actually two separate files that you have to save individually. If you click on File --> Save All, Dreamweaver will save both files automatically.
Step #6 where you save your CSS to div-position.css will not actually save the file until you click to save div-position.css file itself.
Part 5: Uploading
- Upload the entire layout folder to your username folder on the SWS using the Site Definition we created in class. The layout folder should contain a sub-folder called assets that will contain beach_lg.jpg and div-position.css files.
- Mail your instructor using a subject like CAS 111d Div Positioning Your Name
Instructor Note:
As you should be in the habit of doing, be sure to use a browser (or more than one browser) to check your Web pages on the SWS to ensure everything works properly.