Overview
This instructions page contain the following:
- Part 1 - Planning and Preparation
- Part 2 - Structure
- Part 3 - Content
- Part 4 - Styling Additions
- Part 5 - Save and Upload
This is the sixth part of a multi-part project related to the fictional Oregon Film Festival site.
The fourth and last page you create for the Oregon Film Festival site will be the Contact page. It is based on the Home page structure without the need to revise it.
The Contact page will contain a contact form.
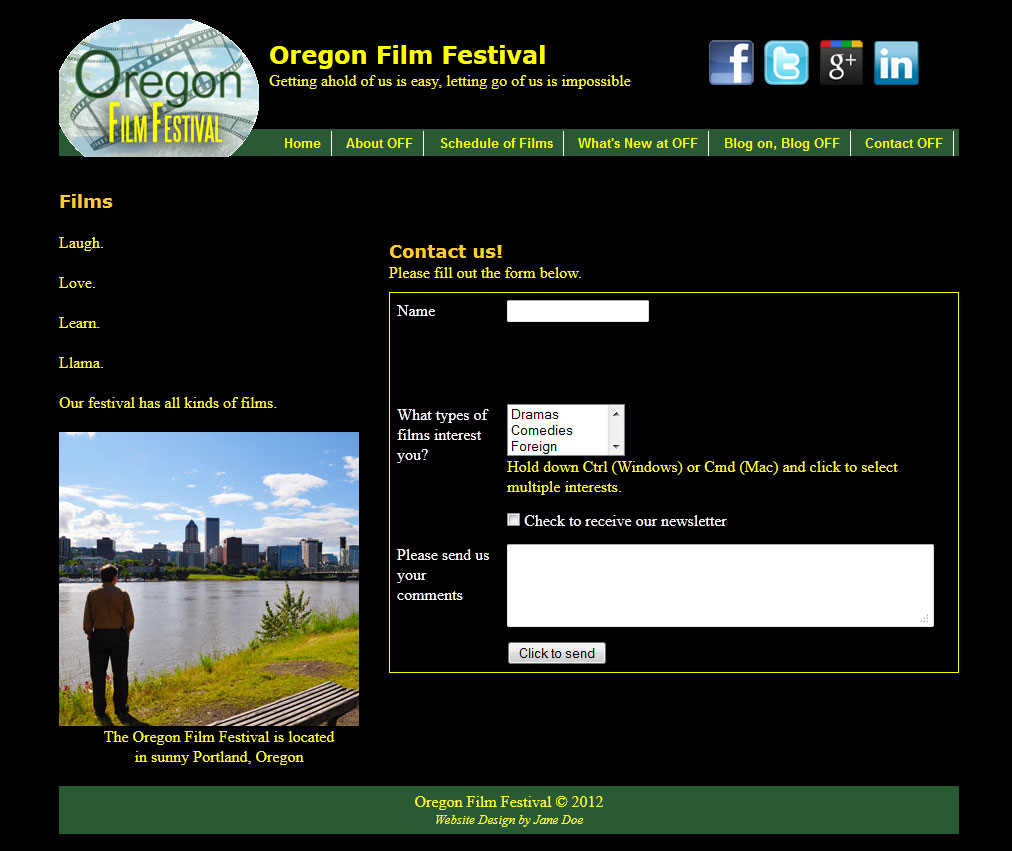
Below is a finished sample of how the Web page should look like when completed.

Part 1: Planning and Preparation
For the Oregon Film Festival site, we'll start by creating the fourth Web page.You have an index page (created in OYO 4), and you'll use that as the basis of your Contact page. The wireframe is the same as the one in OYO 4.
- Make a duplicate of the index.html page.
- Name the copy you just created contact.html
- Close index.html and any other open page if it is currently -- you'll be editing the new page, so don't make the mistake of accidentally editing index.html instead!
Part 2: Structure
There are no changes to the div structure that was copied from the index.html page.
Part 3: Content
You'll first remove some content that carried over from the index.html page to this page. It's more accurate to delete whole tags in Code view.
- Delete the ul and all the text and li tags inside the ul in div#leftcol
- Delete the iframe in div#rightcol
You'll edit and update the content of the index.html page that copied over into this page. You need make it appropriate for this new page. Also, you can do much of this in Design view, or just stay in Code view if you prefer.
- Change the title text to read: Contact us about all things indie film | Oregon Film Festival
- Change the tagline paragraph text under the h1 to now read: Getting ahold of us is easy, letting go of us is impossible
- Change the link to the Home page from # to index.html
- Make a null link to the current page.
- Change the h2 text in div#leftcol to: Films
- Put a blank paragraphs (a p tag with a non-breaking space in it) under the h2 in div#leftcol.
- Put paragraphs under the blank paragraph under the h2 in div#leftcol, and each should have a blank paragraph between them, with the following text (each line is a separate paragraph):
Laugh.
Love.
Learn.
Llama.
Our festival has all kinds of films. - Replace the image in div#leftcol with contact-pdx.jpg in the assets folder in the Files panel. Give this image appropriate alt text like: Oregon Film Festival in Portland, Oregon
- Change the text in the p tag under the image in div#leftcol to: The Oregon Film Festival is located in sunny Portland, Oregon
- Put a break tag (Shift+Enter) between the words "located" and "in" in the paragraph you just updated.
- Change the h2 text in div#rightcol to read: Contact us!
- Change the p text in div#rightcol to read: Please fill out the form below.
The Form
A form is the most common interactive feature of a website. In this sense, "interactive" means how users can interact or do something with the elements of your pages. Of course, specifically, the form is how users contact you through your website. For almost all websites, the form is a required feature.
The form you create for this assignment will not actually work because that requires server-side scripting (like PHP) to make that happen. Server-side scripts can process the data submitted with a form and do things with that data like convert it into an email message that it sends to an email account, or put the data into a database, or use the data as the basis of a search for a search engine, or to output in some other format like XML, etc. The process of making forms work is covered in greater detail in CAS 222, Intermediate Website Design. For the purposes of this class, you'll just concentrate on the form design and how it looks.
It's common for beginning Web designers to mix up the term "form" with the term "field". A field is one box you can type text into, put a check mark in, or is a pull-down menu from which you can make selections. The form is all of the fields, plus the labels of the fields, plus the submit button.
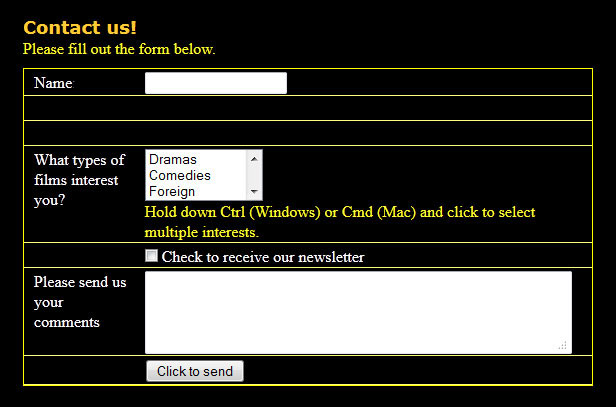
This is an example of a typical contact form: (This is not the form we'll be doing in this assignment.)

For this Contact page, we'll add a form. Inside that form, we'll include a table. We'll place our labels and fields inside the table.
Instructor Note:
This is one of the very rare times I find a table useful (other than for just plain tabular data like the schedule in OYO 6). Since the content of the form (the labels and fields) will rarely change, if ever, a table is useful to keep them all lined up neatly.
- In Design view, click in div#rightcol just after the paragraph that begins with "Please fill..." The insertion point should be between the close of the paragraph and the close of div#rightcol. It may be easier to locate this in Code view than to guess in Design view.
- Insert a form tag, Insert -> Forms -> Form. You'll see a red outline appear in Design view.
Instructor Note:
It's very important to remember: a form consists of one form tag, and all of the table, input, textarea and Spry fields are nested inside that one form tag. That's ONE FORM TAG. You are doing it correctly in Dreamweaver if, in Design view, you have only one red dashed box surrounding all of the fields of the form.
Consider the disaster if you have multiple form tags. If your Submit button is in a separate form tag by itself, it has no relationship to the fields that are in other form tags. When you click that Submit button, it submits nothing.
Unfortunately, in Dreamweaver Design, if you forget to start off with a form tag, everytime you insert a field, it automatically surrounds it with a new form tag... a new form tag for EVERY field... thus making your form useless... ugh! - The form starts out with a generic ID of "form1" -- replace this with an ID "contactform" (no quotes) by clicking on the form, and editing the ID in the left field of the Properties panel. It's important to give it an ID that isn't already used.
- Insert a table into the form tag (red dashed area). The table should have
- 7 rows
- 2 columns
- Cellpadding: 0
- Cellspacing: 0
- Border: 0
- Width: 100% -- be careful, that's 100 percent with a percent sign and NOT 100px
- Header of None
- At this point, you should have something that looks like this in Design view:
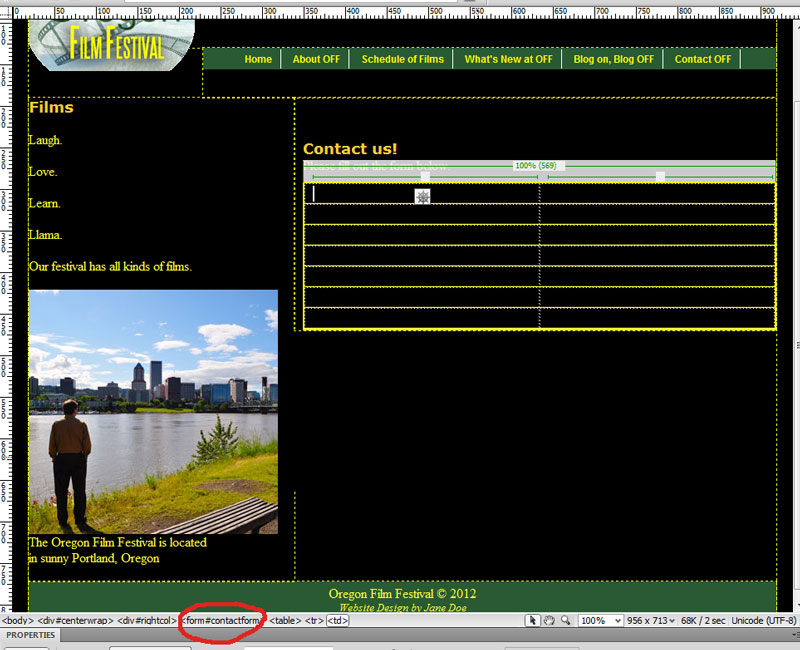
- There is a red dashed line around the table indicating the table is inside the form, but because the table has a yellow outline, you can't really see the red dashed line of the form tag. You can ensure that the table is correctly inside the form tag by clicking anywhere inside the table and looking on the status bar. You should see the <form#contactform> shorthand tag (circled in red in the image above) on the left of the table tag indicating the table is nested inside the form.
Now we can begin inserting the fields inside the table cells (tds).
- In Design view, click your cursor in table Row 1, Column 2.
Instructor Note:
Remember, rows are horizontal and columns are vertical. - Insert a text field into Row 1, Column 2 by choosing Insert -> Forms -> Text Field
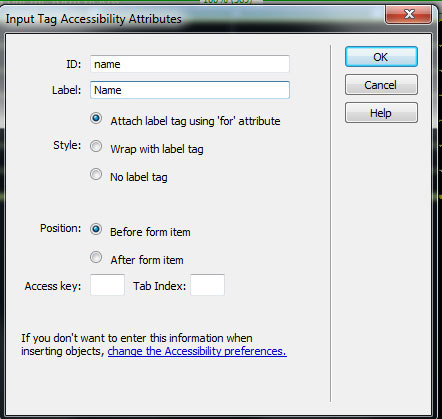
- When the Input Tag Accessibility Attributes window pops up, give the form field an ID "name" (no quotes) a label "Name" (no quotes) and select the Attach label tag... Style as shown:
Instructor Note:
This is a critical step. ALL form fields should have a unique ID and that ID should be lower case and no spaces -- it will appear in Code view in the HTML as both an ID attribute and a name attribute. The ID attribute will be used if you want to style the fields in CSS using an ID selector or target it with JavaScript. The name attribute is called by the server-side script to pull the data contained within the field into the server-side file for processing.
It's important that each field have both an ID and name attribute, and it's acceptable that those two attributes have the same value, in this case "name", since the attributes are used in two different ways. Dreamweaver automatically gives you both an ID and name attribute with the value you put in that ID field in the Input Tag Accessibility Attributes window.
The label field, however, can have any characters in it -- it's just text, so feel free to use caps, spaces and symbols for the label if you want.
Finally, the reason you're choosing Attach label tag... is to ensure that the label is connected to the correct field. This is an accessibility issue. If the label is associated with a field, then the form user can click on the label and have the cursor automatically position itself in the field. This is for people who have motor control or hand-eye coordination disabilities. Their assistive software can usually increase the size of a text label, but not the field itself. So, for them, they have an easier time targeting a label with the mouse than they do the field itself. When they click the label, the cursor jumps to the field, then they can begin typing in the field. This is also useful for people with visual impairments who are using screen readers to "read" the Web page for them. The screen reader can only read the label and not the field, so the user may not know where or how to click in the field. They can however use the screen reader to help them target the label, and by clicking on the label, they are automatically sent into the field so long as you have a for attribute in the label tag (as you selected in the Input Tag Accessibility Attributes window). If you selected that option, you can literally move the label anywhere on the page, although it's best to keep it near the field it's associated with for usability purposes. - Click Ok.
- Click anywhere on the text label Name: in Design view.
- Click the <label> tag on the status bar to select the Name: label.
- Drag the Name: label into Row 1, Column 1.
Instructor Note:
A couple of your last actions are important to the success of moving a label away from a field. There has been a known issue or quirk in some versions of Dreamweaver with this process in Design view. If you insert the field with its label into Column 1, then attempt to move the field away from the label, the 'for' attribute will get lost (either completely removed or it will point to the wrong target field). It's best in Dreamweaver to move the label away from the field. Once again, move the label away from the field, and DO NOT move the field away from the label. It sounds like a minor issue, but it will make a big difference in how the label and field connect to each other. This is why you start by inserting all fields into Column 2, then pull their labels into Column 1. - In Row 4, Column 2 (yes, skip two rows), insert a List/Menu selection field by going to Insert -> Form -> Select (List/Menu)
- In the Input Tag Accessibility Attributes window, give it an ID of "interests" (no quotes) and a label of "What types of films interest you?" (no quotes). Be sure that "Attach label using 'for' attribute" is selected. Click Ok.
- Click anywhere on the What are your interests? label then click to the <label> tag on the status bar to select it. Drag the label into Column 1 of the same row.
- Widen the table and Column 1 in Design view so that What are your interests? is on one line.
- Click the List/Menu field in Row 4, Column 2. Note that new Properties appear in the Properties panel that specifically relate to this field.
- In the Properties panel, click List Values... Add the following Item Labels and Values as shown in the List Values window:
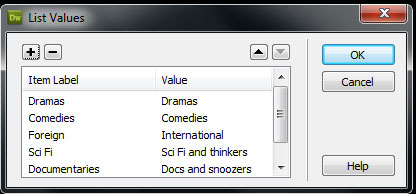
- You use the plus sign to add labels and the minus sign to remove them. You can also change their order with the up and down arrows. Then click Ok when you're done.
Instructor Note:
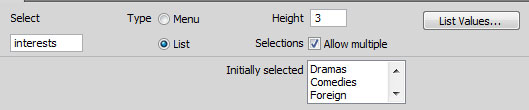
The label doesn't have to match the value. The label will be seen by the person using the form, but the value is what's sent to the server-side script (if you have that set up) and what's received by the form data receiver (usually you). You can be quite creative with your values! Of course, these values can be seen in Code view... ahem... - Select the List/Menu field again if it's not.
- In the Properties, choose Type List instead of Menu. That will make it so the field can be more than one line tall and allow multiple selections.
- In Height, replace 1 with 3. Check Selections Allow multiple. The Properties will look like this:
- Click an insertion point (the cursor) after the List field in Row 4, Column 2 and press enter to create a paragraph below it in the same row. Type (or copy and paste) the following text:
Hold down Ctrl (Windows) or Cmd (Mac) and click to select multiple interests.
- Click in Row 5, Column 2.
- Insert a checkbox field by choosing Insert -> Form -> Checkbox
- In the Input Tag Accessibility Attributes window, give it the ID "addme" (no quotes) and the label "Check to receive our newsletter" (no quotes). Click Ok.
- Leave this label in Column 2 after the box as you see it now. It will look odd if it's in Column 1 and the checkbox is alone in Column 2.
- Click in Row 6, Column 2.
- Insert a textarea field by choosing Insert -> Form -> Textarea (a textarea field is commonly used for comments or to send longer messages from a form)
- In the Input Tag Accessibility Attributes window, give it the ID "comments" (no quotes) and the label "Please send us your comments" (no quotes). Be sure that "Attach label using 'for' attribute" is selected. Click Ok.
- Click anywhere on the Please send us your comments label, click the <label> tag on the status bar to select it, and drag it into Column 1 of the same row.
- Click on the textarea field.
- In the Properties panel, give it a Character Width of 50 (instead of the default 45) and a Num lines of 4 (instead of the default 5).
- Adjust the width of the table and Column 1 so that all the labels are on one line only.
- Click in Row 7, Column 2.
- Insert a button by choosing Insert -> Form -> Button
- Give the button an ID of "submit" (no quotes). Do not give the button a label (and by default, label is check "No").
- Click on the Submit button and change the value in Properties from "Submit" to "Click to send" (no quotes). The Action should stay defaulted to Submit form.
Instructor Note:
There are two button types. Submit will send the data contents of a form to a server-side script if all the form and field values are set properly. Reset will clear the fields so the user can re-enter their data. You can create both buttons on your form if you prefer. - Save and preview the page in a browser. It should look something like this in Firefox:
HTML 5 Validation Fields
Now we'll add the last two fields in rows 2 and 3. Both of these require editing the code. Also, because these are HTML5 additions to the form tags, you'll need to be sure your doctype for the HTML is in proper HTML5 format:
<!doctype html>
- In Design view, following the steps described beginning on Step 22 above, insert another text field in Row 2, Column 2. Give it an ID of "preferredname" (no quotes) and a label of "What is your preferred name?" (no quotes). Then move the label into Column 1 of that row..
- Insert the final text field in Row 3, Column 2. Give it an ID of "emailaddress" (no quotes) and a label of "Email address" (no quotes). Then move the label into Column 1 of that row.
- Switch to Code view or you can use Quick Tag Editor on the input tags.
- Add the HTML5 attribute required to the input tags of both the new input fields for input#preferredname and input#emailaddress that you just added. For example, the new code for input#preferredname would be:
<input type="text" name="preferredname" id="preferredname" required>
Instructor Note:
Notice that required is an attribute that doesn't have a value following it. The only value that is valid for it is "required", however required="required" was considered redundant, so you only need to go with the attribute alone.
That required attribute can go in any order in the input tag and is just shown at the end of that tag in the example above. - On the emailaddress field, change type="text" to type="email". This is an HTML5 validation value that, when the field is required, the browser should verify that what is typed in the field follows the format of an email address. It will look like this now in Code view:
<input type="email" name="emailaddress" id="emailaddress" required> - Preview the form in a browser and click the Click to send button. You should see a message "Please fill out this field" (Chrome, Firefox) or "This is a required field" (Internet Explorer version 10 or above) for those fields (first one first) if they are left blank. Note also that the email field requires that the format of the data entry into that field must conform to an email address type and include an @ sign and a period.
Part 4 -- Styling Additions
For this part, you'll use the CSS Styles Panel (All Button) to add to your existing oregonff.css style sheet for this page.
The lines on all the tds are a bit distracting on this table. To override the existing td style, you can use a descendant selector.
- Create the following descendant selector (Compound) and put it under #mainimage in the CSS:
#contactform td
(Note, there is a space between "#contactform" and "td". This means all the td's within the form#contactform will be styled in this way. This will not affect the td's from the Schedule page.)
- Give it the properties
- border-width: 0 -- this will shut down all the borders on all the td's
- padding: 7px; -- padding on all sides of 7px
- Apply .centerit to the paragraph that begins "The Oregon..." in div#leftcol.
- Preview this page in a browser and it should look very similar to this:
Part 5: Saving and Uploading
- Save the files you just created to the SWS using the Site Definition we created in class.
- Test this on the SWS with one or more browsers to make sure it functions properly.
- Mail your instructor using a subject like CAS 111d OYO7 Uploaded Your Name (where Your Name is your actual name).
Instructor Note:
As you should be in the habit of doing, be sure to use a browser (or more than one browser) to check your Web pages on the SWS to ensure everything works properly.