Overview
This instructions page contain the following:
- Part 1 - Planning and Preparation
- Part 2 - Structure
- Part 3 - Content
- Part 4 - Styling Additions
- Part 5 - Save and Upload
This is the sixth part of a multi-part project related to the fictional Oregon Film Festival site.
The third page you create for the Oregon Film Festival site will be the Schedule of Films page. It is based on the Home page structure without the need to revise it.
The Schedule page will contain a table including tabular data related to the film screening schedule for the festival.
Below is a finished sample of how the Web page should look like when completed.

Part 1: Planning and Preparation
For the Oregon Film Festival site, we'll start by creating the third Web page.You have an index page (created in OYO 4), and you'll use that as the basis of your Schedule of Films page. The wireframe is the same as the one in OYO 4.
- Make a duplicate of the index.html page.
- Name the copy you just created schedule-films.html
- Close index.html and any other open page if it is currently -- you'll be editing the new page, so don't make the mistake of accidentally editing index.html instead!
Part 2: Structure
There are no changes to the div structure that was copied from the index.html page.
Part 3: Content
You'll first remove some content that carried over from the index.html page to this page. It's more accurate to delete whole tags in Code view.
- Delete the ul and all the text and li tags inside the ul in div#leftcol
- Delete the iframe in div#rightcol
You'll edit and update the content of the index.html page that copied over into this page. You need make it appropriate for this new page. Also, you can do much of this in Design view, or just stay in Code view if you prefer.
- Change the title text to read: Our Schedule of Films this year | Oregon Film Festival
- Change the tagline paragraph text under the h1 to now read: It was the best of times, it was the even better of times
- Change the link to the Home page from # to index.html
- Make a null link to the current page.
- Change the h2 text in div#leftcol to: An Amazing Farce!
- Put a paragraph under the h2 in div#leftcol with the following text:
Godot. The search for lost luggage leads to bizarre encounters, diabolical terrorism, and even the key to winning a long-standing civil war in this existential farce which has little to do with the Samuel Beckett play Waiting for Godot.
- Put the film title "Godot" and the play title "Waiting for Godot" in italics (an em tag around those words) in the paragraph you just added in Step 8 above (if they aren't already). You would use the italic button in the Properties panel. In Code view, you'll see an em tag around those words. It means "emphasis", which, in browsers, looks like italic.
- Replace the image in div#leftcol with a new image. The fastest way to do this is to, in Design view, click on the image in div#leftcol. Drag the Src Point to File pointer to select the image godot-still.jpg in the assets folder in the Files panel. Be careful not to drag on the Link Point to File pointer (below the Src Point to File feature) which would cause the image to be linked to the other image instead of being replaced by it. Give this new image appropriate alt text like: Christine Aruba-Orleans in Godot
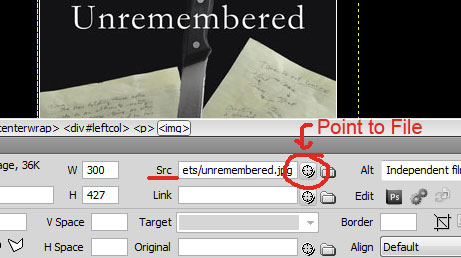
- Change the text in the p tag under the image in div#leftcol to: Christine Aruba-Orleans in a still from the hilarious feature film Godot
- Add a blank paragraph under the paragraph you just changed.
- Add a new paragraph under the blank paragraph you just added with the text:
Godot makes its Northwest premiere at the Oregon Film Festival on Friday at 7:30pm! Afterward, meet the director, writer and cast and crew!
- Make the title of the film "Godot" italic (an em tag around just that word) in the paragraphs you just edited and added (Step 11 and 13 above) in div#leftcol.
- Change the h2 text in div#rightcol to read: This Weekend at OFF!
- Change the p text in div#rightcol to read: Screenings highlighted in red below include a Q&A with the filmmakers
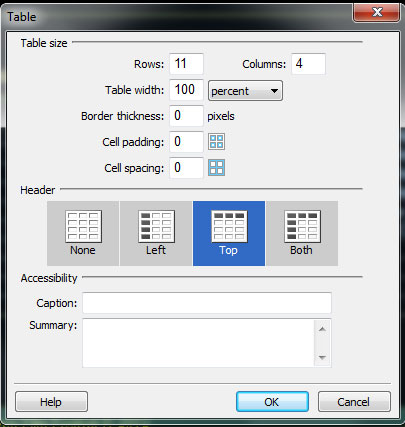
- In Design view, immediately after the p tag you just added (and without hitting Enter which would create another p tag), insert a table (Insert -> Table) with the following attributes:
- 11 rows
- 4 columns
- Table Width: 100% -- be careful, that's 100 percent with a percent sign and NOT 100px
- Border thickness: 0
- Cellpadding: 0
- Cellspacing: 0
- Top (row 1) header
- The Table dialog window should look like this with the setting described above:
Instructor Note:
By the way, if you don't get this dialog window (above), you can still edit these settings in the Properties panel. If you want to get the dialogue window to appear when it isn't, go into Edit -> Preferences -> General -> Show Dialog When Inserting Objects (make sure this is checked).
- If you look in Code view, you'll see that the table is made up of 4 different tags:
- table -- just one of these and it surrounds all the other tags
- tr -- "table row" and there is one of these for every row in the table
- th -- "table header" and there is one for each column in the header row (row 1)
- td -- "table data" and there is one for every column in all rows, except the table header row
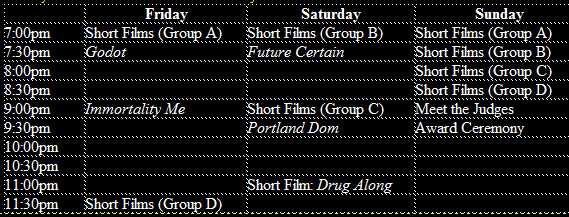
- Type the content you see in the image below into the cells (td tags) in the table in Design view. Be sure to add italic to the film names as shown in the table below:
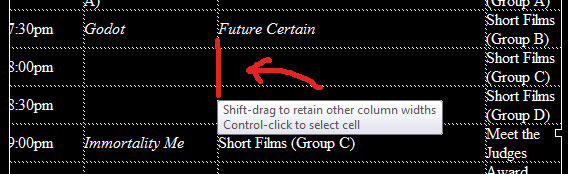
- You'll notice that as you type, the table column widths may change -- dramatically and awkwardly in some cases! If you need to adjust them, move your cursor over the line between columns and drag them to make them more appropriate widths. Sometimes, it works best to not worry about column widths until you are completely done typing the content into the table.
- Once you've typed in all the data into the table td tags, you can resize the column widths (as described in Step 21) to conform more to the look of the image after Step 20 above.
- Now, merge cells together (described in the textbook section Merging and Splitting Cells) as shown in the image below:

Instructor Note:
There are 5 merges: 2 in the Friday column, 2 in the Saturday column, and 1 in the Sunday column.
Part 4 -- Styling Additions
For this part, you'll use the CSS Styles Panel (All Button) to add to your existing oregonff.css style sheet for this page.
- Create the tag selectors as follows (they should stay in the order they are listed here and be placed after the existing p tag selector in the CSS -- be sure to click on the p tag selector before you begin to create the first new selector):
- table - margin-top: 10px; border: solid thin #FF0;
- th - background-color: #295A33; color: #FF0; padding: 5px 0; border-bottom: solid thin #FF0; -- be careful to ONLY style the bottom border by unchecking "Same for all" on those properties
- td - padding: 3px 2px 1px 10px; vertical-align: top; border-bottom: groove thin #FF0; -- again, it's the bottom border only
- Create the class selectors as follows (place these below .credit in the CSS styles panel in this order):
- .centerit - text-align: center;
- .highlight_schedule - background-color: #900;
- Apply the class selector .highlight_schedule to the td's in the table that contain the following data (this process is explained in more detail below if you don't recall how to do it):
- Godot
- Short Film: Drug Along
- Short Films (Group A) (Sunday column only)
- Award Ceremony
- Remember, to apply the class selectors, the easiest way is to click inside the tag, click the tag name on the status bar, then choose the class in the Properties panel class pull-down menu. This image shows and describes the process:
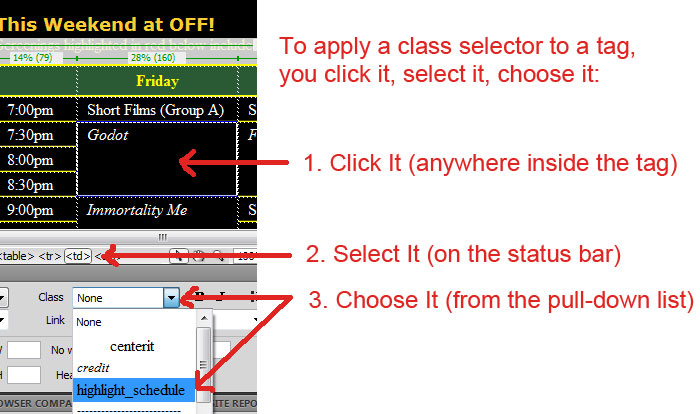
- Keep in mind that if you do not select the tag on the status bar, you are very likely to apply the class to the wrong tag, in which case it may do nothing, or do something very unexpected. Always select the tag you want to work with on the status bar to be sure.
- Apply .centerit to the paragraph that begins "Christine..." in div#leftcol.
- Put a break tag (using Shift+Enter) between the words "from" and "the" in the paragraph that begins "Christine..." in div#leftcol.
After styling this page, it should look very similar to the example linked to top of this page.
Part 5: Saving and Uploading
- Save the files you just created to the SWS using the Site Definition we created in class.
- Test this on the SWS with one or more browsers to make sure it functions properly.
- Mail your instructor using a subject like CAS 111d OYO6 Uploaded Your Name (where Your Name is your actual name).
Instructor Note:
As you should be in the habit of doing, be sure to use a browser (or more than one browser) to check your Web pages on the SWS to ensure everything works properly.