Overview
This instructions page contain the following:
- Part 1 - Planning and Preparation
- Part 2 - Structure
- Part 3 - Content
- Part 4 - Styling Additions
- Part 5 - Scripting: Disjointed Rollovers
- Part 6 - Save and Upload
This is the fifth part of a multi-part project related to the fictional Oregon Film Festival site.
The second page you create for the Oregon Film Festival site will be the What's New page. It will be based on the Home page, but contain new content and a revised structure.
Part of the new content is a picture gallery made up of disjointed image rollovers. When the mouse moves over the smaller, thumbnail images, the image in the main area changes to a large version of the thumbnail. This is a type of rollover behavior referred to as a disjointed rollover since the rollover is not occurring to the smaller image the mouse moves over, but rather to another image on the same page in a different location. This is commonly done on picture gallery type Web pages.
We'll be using Javascript Behaviors to perform the disjointed rollovers. Below is a finished sample of how the Web page should look like when completed.

Part 1: Planning and Preparation
For the Oregon Film Festival site, we'll start by creating the second Web page.You have an index page (created in OYO 4), and you'll use that as the basis of your What's New page.
Here's the wireframe of the Oregon Film Festival What's New page (news-off.html) you'll create:
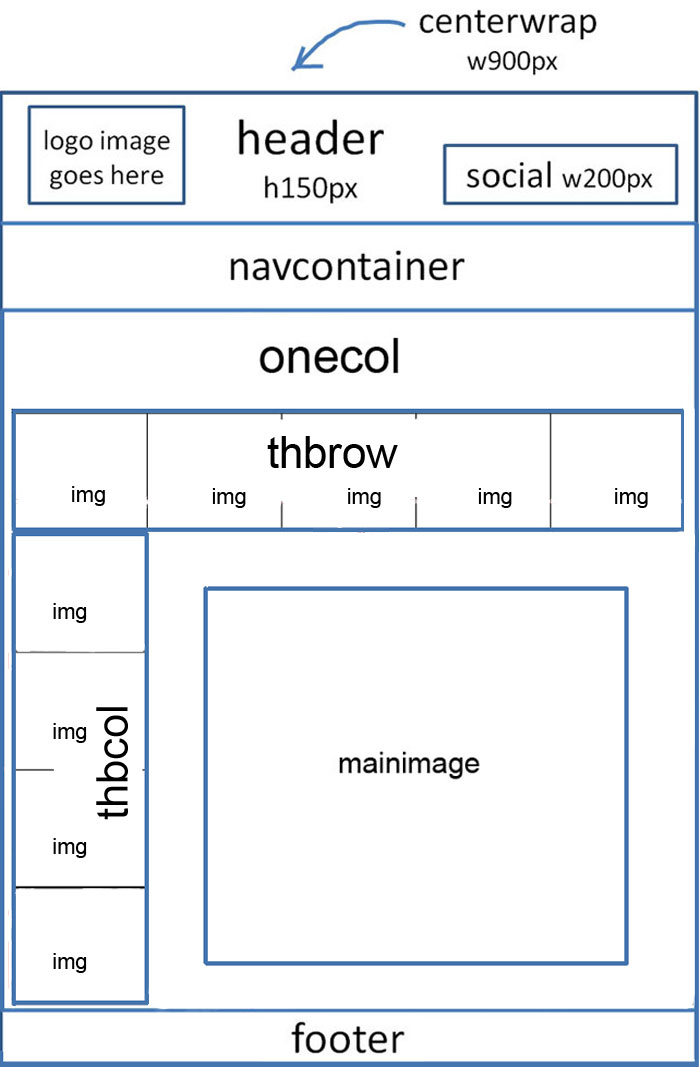
Note the following changes or additions to the structure of this page compared to index.html:
- There are no longer two columns in the middle of the page -- there is now only one column, with the ID "onecol".
- Inside div#onecol, there are three new divs, with the following IDs: "thbrow", "thbcol" and "mainimage".
- There are five thumbnail images in div#thbrow (this div is the row across the top that holds thumbnail images, which is why it's called thbrow).
- There are four thumbnail images in div#thbcol (this div is a column on the left that holds thumbnail images, which is why it's called thbcol).
So, in total, you'll have 9 divs for your structure on this page. In these instructions, they'll be referred to by the name you see above or by their shortcut name: div#centerwrap, div#header, div#social, div#navcontainer, div#onecol, div#thbrow, div#thbcol, div#mainimage, and div#footer.
- Make a duplicate of the index.html page you created in OYO 4.
Instructor Note:
You can copy and paste the new file by right-clicking on it in the Files panel, then using Edit->Copy, etc., however, it's faster to use the Duplicate option. It's even faster to use the keystroke combination for Duplicate, which is Ctrl+D (PC). Duplicate does an immediate copy and paste into the same folder. Just click on the file in the Files panel, then press Ctrl+D. - Name the copy you just created news-off.html
- Close index.html if it's currently open -- you'll be editing the new page, so don't make the mistake of accidentally editing index.html instead!
Part 2: Structure
Now that you see what you're goal is (in the wireframe above), you'll be able to update the structure following the steps below. It's not always the case that you'll have to update the structure of a page on your site when you copy the original page you made. In this case, it makes sense, because news-off.html only has one column instead of two in the middle section.
- With news-off.html page open in Dreamweaver, switch to Code view if you aren't already there.
- Delete the entire div#rightcol and all its content. This includes the opening and closing div tags, the h2 tag, the p tag, and the iframe tag that are inside the div. Be very careful NOT to delete any extra tags or other divs in the code. The easiest (and most foolproof way!) to do this is to select the <div#rightcol> on the status bar, then press the delete key on your keyboard.
- Delete all of the content in div#leftcol, but leave the div tag as it is. The content you are deleting includes the h2 tag, the ul tag and nested li tags, and all the p tags. In this case, be very careful NOT to delete the opening or closing div tags of div#leftcol.
- Change <div id="leftcol"> to <div id="onecol"> -- type this new ID into the div tag in Code view.
Instructor Note:
It should be emphasized at this point that you are radically altering the structure of this page to make it one column instead of two in that middle section. This will basically give you two different layout structures on your site. The index page has a two column structure, and the news-off page has a one column structure. This is not uncommon in Web design. In fact, on most sites, you'll find that the columns from page to page may vary in number or size, so it may require you to create more than one wireframe while planning your website. Then again, it's not complicated to make a simple adjustment like this one on a page-by-page basis if you need to. - The div#onecol that you just made as a replacement for div#leftcol doesn't need to have any style associated with it in the CSS, so no need to create an ID selector. By default, the div isn't floating and has a width of 100%, which is exactly the way we want to leave it.
- Use the Format Source Code bucket and Apply Source Formatting to spruce of your HTML code.
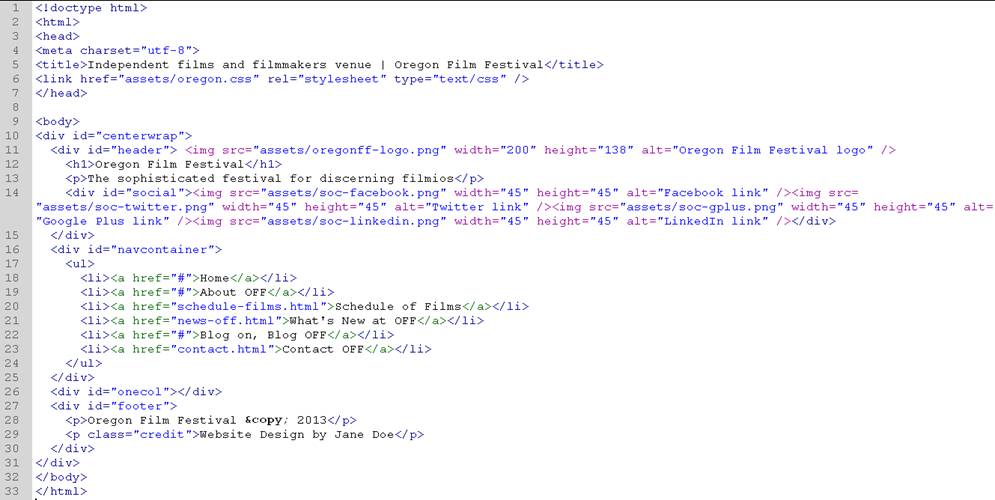
- Your code for the news-off.html page should now look very much like this in Code view:
- In Code view, type in the other three divs, "thbrow", "thbcol" and "mainimage", inside div#onecol -- be careful that all the divs are closed prior to div#onecol closing. Also, these divs should NOT be nested in one another.
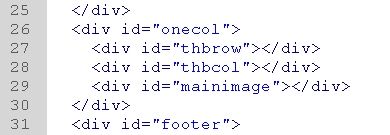
- Apply Source Formatting to make the tags more readable in the code. Your code, around div#onecol, should look like this (although your line numbers may be slightly different which is not a problem):
Part 3: Content
You'll first edit the content that carried over from the index.html page to this page. You need make it appropriate for this new page. Also, you can do much of this in Design view, or just stay in Code view if you prefer.
- Change the title text to read: Recent indie film news | Oregon Film Festival
- Change the tagline paragraph text under the h1 to now read: Here's what's new and what's news at OFF
- Change the link to the Home page from # to index.html. Make sure you also change the link to the About OFF from # to about-oregon-film-festival.html if you haven't done so.
- Change the link to this current page from news-off.html (itself) to #
Instructor Note:
As stated in OYO 4, it's much better to have a null link than linking the page you are on back to itself. If a user clicks on the link, and it's linking back to itself, it may reload the page in the browser window. This reloading (which, as you've seen, can cause a visual "flash" on the page) is likely to cause the user to think they've gone to a different page. It's just confusing. So instead, use the # (a null link) so the page doesn't do anything when the link is clicked on.
Also, you might be thinking, "well, why don't I remove the link entirely?". If you remove the link -- the a tag -- then its associated style goes away. In other words, that menu item won't look styled like the other navbar "buttons" on the site. So, again, it's one more reason to use the null link.
That's all the updated content. Now you'll add the new text content:
- Inside div#onecol, add an h2 that reads: We went behind the scenes of the new Portland indie short, Wrong Room
- Be careful where you place that h2 above. It should be placed between the opening of div#onecol and div#thbrow.
- Put an em tag, using the italic button in the Properties panel, around the film title Wrong Room
Next, you'll add the image content. But first, take a look in the Files panel at the images you're about to add, so you do it correctly. Your files panel should look very much like this one:
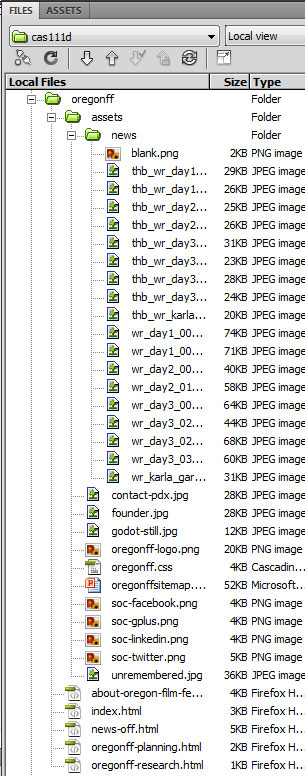
If you haven't looked in the news sub-folder yet under the assets folder, do so now. (This news sub-folder was in the Zip file you used to extract your assets in OYO 3. If you don't see the news folder inside the assets folder, be sure to get a copy of it from the oregonff Course Files.)
Note that inside the news sub-folder there are 19 images. 9 of the images are thumbnails (175x131) of the 9 larger images (600x450). In planning ahead, they have all been sized the same so they won't look awkward when the rollover occurs. Finally, there is 1 image file that is a blank image (600x450). This blank image is placed in div#mainimage and is used as the image the larger images are swapped out (rolled over) from. This will be explained in more detail in Part 5 below.
Based on the image dimensions stated above, you can make a few calculations to determine if or how the images will fit into their divs:
- There are 5 thumbnail images across (horizontally) in div#thbrow. Since they are each 175px wide, then 5x175=875. Therefore, five across the row, will fit with the container div#centerwrap (900px wide) with a little room to spare.
- The thumbnail images are 131px in height and there are 4 of them in div#thbcol, 4x131=524.
- Therefore, based on the sizes above, div#thbrow is 875x131. (You will not need to set it's height and width in the CSS since the image content will force it to that size already.
Instructor Note:
If you hadn't noticed this, text content inside a div will increase its height, regardless of what height you give the div in the CSS. The more text you put in a div, the taller it gets. Text content doesn't make a div wider though, so when you set a width (like on a div being used as a column), it won't be forced wider by the amount of text content in the div.
Image content is different. Images can increase a div's height AND width. In other words, one image that is wider than the div you put it inside, will force that div to match its width. This is why, with images, you should size them to fit your divs, otherwise, your divs will conform to the image's height and width and possibly throw off the layout of your page. Always, always, always size the images to fit inside your divs, and remember to take into account any padding inside the divs when you size your images. That being said, if you have multiple images, and the div width that they are in is the size of the largest of those images, then they may nicely stack on top of one another.
The CAS 208, Photoshop, class gets into more about how to work with images and re-size them. - Therefore, based on the sizes of the images, div#thbcol is 175x524. This div also floats left to make a kind of a left column out of it. (It doesn't have the same dimensions as the actual #leftcol used on the Home page, so they aren't interchangeable, by the way.)
- The larger images are 600x450, so div#mainimage only needs to be 450px in height, however, to make it fit and look good next to the 524px tall div#thbcol, it will be useful to put some padding inside it to make the 600x450 images look balanced. Top and bottom padding of 37px each, to be exact. This may seem like an odd number, but the number was calculated by taking the height of div#thbrow (524px) and subracting the height of div#mainimage (450px), then dividing the difference by two (for top and bottom padding). This is 524-450, which is 74, and 74 divided by 2 is 37. This should make it so that div#mainimage is vertically centered to div#thbrow.
Instructor Note:
There is no other way in Web design to effectively vertically center a div like this -- this is an often complained about serious flaw in Web design: no vertical centering. To make a div appear to center vertically, you'll have to use some combination of padding or margin on the top and/or bottom or top position with absolute or fixed position divs. To make it perfect without guessing, you'll have to do the math. - There are 4 thumbnail images above div#mainimage. They are a total of 700px wide. Since the images inside div#mainimage are only 600px wide, it will be necessary to pad the left and right of div#mainimage by 50px each to make it look balanced. (700-600=100, and 100/2=50)
We can put these calculations away for the moment until we are ready to do the CSS styling in Part 4 (below).
In Code view, add the images to news-off.html as follows:
- In div#thbrow, insert, in ascending alphabetical order, the first 5 thumbnail images. They each begin with the letters "thb". You should give each of them alt text. The alt text is up to you, but you should may want to keep it brief, like "Camera test" for the first image, and "Director smiling" for the second image, and so on. Since you may not be able to identify what's going on in the images, you can make the alt text very brief, like "pic1" for the first image, "pic2" for the second image, and so on.
Instructor Note:
It's safer to insert images into the div in Code view at this point since you can't easily see the divs you just added in Design view. - In div#thbcol, insert the final 4 thumbnail "thb" images in ascending alphabetical order. The alt text should be there, but can be very basic (as stated above).
- In div#mainimage, insert the blank.png image. Appropriate alt text for this image could be "blank image for rollover".
When you are finished inserting the image content, your Web page should look very similar to this in Design view:

Instructor Note:
Be careful that there are no spaces between the images -- note above that they should be tight together. In preparing this the first time, I noticed I'd inadvertently left single blank spaces between the images. This will cause
your measurements in Part 4 (below) to be thrown off. It's easier to remove any extra blank spaces in Code view rather than Design view.
Here's what the code in div#onecol looks like:

It may appear a bit messy, but it doesn't contain spaces between the images, so it is correct as it is.
Part 4 -- Styling Additions
For this part, you'll use the CSS Styles Panel (All Button) to add to your existing oregonff.css style sheet for this page.
Create the selectors as follows (they should stay in the order they are listed here):
- Create the following ID selectors (place these below #rightcol in the CSS styles panel in this order):
- #thbrow - margin-top: 15px; -- this separates the top row of images from the h2 text above it
- #thbcol - width: 175px; float: left;
- #mainimage - width: 600px; height: 450px; padding: 37px 50px; float: right;
Instructor Note:
Setting "padding: 37px 50px;" is the same as setting Top/Bottom padding to 37px each and Right/Left padding to 50px each.
After styling this page, it should look very similar to this in a browser (Chrome in this case):

- The thumbnail images look a bit smooshed. They appear to need margin to separate them. Right now, the 5 images in div#thbrow are a total of 875px in width, and #centerwrap is 900px in width. So, if you put 5px of right margin after each of the 5 images, then they should fit exactly to the width of #centerwrap. Also, some bottom margin would help to separate div#thbrow from div#thbcol and make those look better.
- To do this create a Compound (descendant) selector #thbrow img and give it margin: 0 5px 5px 0; -- this effects only those images in div#thbrow and not the images elsewhere on the page. (Put this descendant selector under the ID selector #thbrow in the CSS.)
- Create a second Compound (descendant) selector #thbcol img and give it margin: 0 0 5px 0; -- this adds bottom margin to the images only within div#thbcol making them have a little separation. (Put this descendant selector under the ID selector #thbcol in the CSS.)
- Check the page again in a browser. It should look much like the image above, but with just a bit of space between each image.
Part 5 -- Scripting: Disjointed Rollovers
An image rollover is an image effect. To do rollovers or other image effects, you often must utilize JavaScript. JavaScript, which is a scripting language and very much like a programming language, is described in more detail in later classes. For now, you'll just use the JavaScript features built into Dreamweaver. Dreamweaver creates this script for you so you don't have to know how to write programming language code to do it yourself.
Instructor Note:
Some issues to keep in mind with JavaScript:
JavaScript is a scripting language owned by the Oracle Corporation. Although Oracle allows people to use the JavaScript code you create with their language without royalties (in other words, they don't charge you to use, copy or share JavaScript), they will attempt to collect royalties from you if you sell JavaScript code. Adobe, concerned about the fact that Oracle can change their royalty policy at any time, decided to try to minimize the legal issues. So in Dreamweaver, they avoid using the name "JavaScript" by calling their usage of that language "Behaviors". But, Behaviors in Dreamweaver are JavaScript scripts.
Keep in mind that browsers can be set to NOT run JavaScript functions. This is because JavaScript has been know to be a language that viruses are created in, so some people just choose to turn off this function in their browser. If your browser, or someone's browser who's looking at your page has JavaScript turned off, then you or they will not be able to see the rollover (or any other JavaScript effect) occur.
When testing your rollovers, you must do this in a browser. By default, Internet Explorer does throw up a warning flag to you if you attempt to test a Web page with JavaScript on it locally -- you'll have to Enable the scripting when you test JavaScript on your own computer. Oddly, IE doesn't seem to have a problem -- no warning by default -- if you go to any random page on the Internet that contains JavaScript...
A standard rollover occurs when you move the mouse pointer over one image and it turns into another.
A disjointed rollover occurs when you move the mouse pointer over one image and another image somewhere else on the page changes. Note this example of a disjointed rollover with bears. Notice that as you move your mouse over the smaller images (thumbnails), a larger image of the thumbnail appears below it. To accomplish this effect, you must "swap" or rollover one image to another. This means that the larger image of the bears that appears is being swapped with a blank image of the same size. You can't see it -- it's blank (no color or you can make it the same color as the background color of the page).
For this final part, you'll use the built-in Behaviors (JavaScript) in Dreamweaver to create disjointed (disconnected) rollovers. The effect you are going for is that when the mouse hovers over each of the thumbnail images, the blank image in div#mainimage rolls over to show the larger image that corresponds to the thumbnail image.
- Prepare the thumbnail images by ID'ing all of them with appropriate one word (no spaces), lower case names. Images must have unique ID's to be able to target them with JavaScript (Behaviors). Much like div tags, these images cannot be shared by any other element on the page -- this includes div tags. In other words, you can't have an image with the same ID as a div, so be careful when giving them ID's not to use a name you've already used. You can put the ID in Code view (e.g., id="whatever" in the img tag of each), or you can use the ID box in the left of the Properties panel in Design view. The picture below describes the process of doing this in the Properties panel:
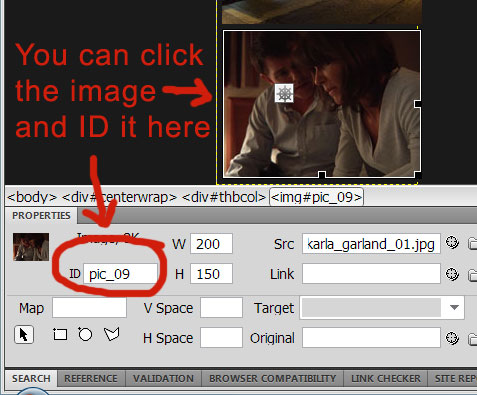
Instructor Note:
ID's should be unique to each image and should not duplicate any other ID's on the page, including ID's used with the divs. Good (and meaningful) ID's for the images across the top row would be, in order from left to right, "camera_test", "director", "boom", "asst_director", "behind_scenes". Again, remember not to duplicate any of the div ID's and they should be lower case with no spaces and no odd characters -- underscores are fine, but avoid hyphens for ID names.
Of course, if you don't know what these are images of, it's more difficult to make up meaningful ID's for them. In that case, "pic_01", "pic_02", "pic_03", etc. will work just fine, too. - The blank image in div#mainimage should also be ID'ed. A good choice for this one is "blank_image".
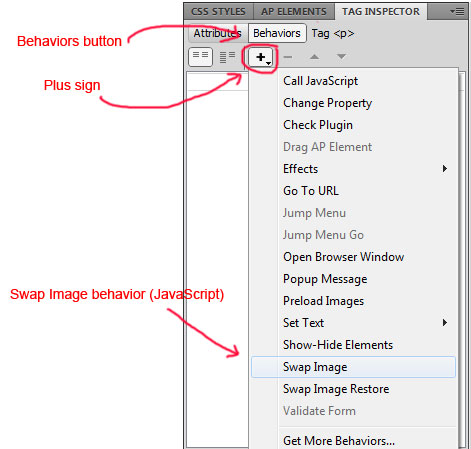
- Open up the Tag Inspector - Behaviors panel (Shift+F4 or under Window -> Behaviors on the main menu). This will make the JavaScript rollover (Swap Image is what they call it) behavior accessible to you.
- After clicking Swap Image, the Swap Image dialogue window appears:
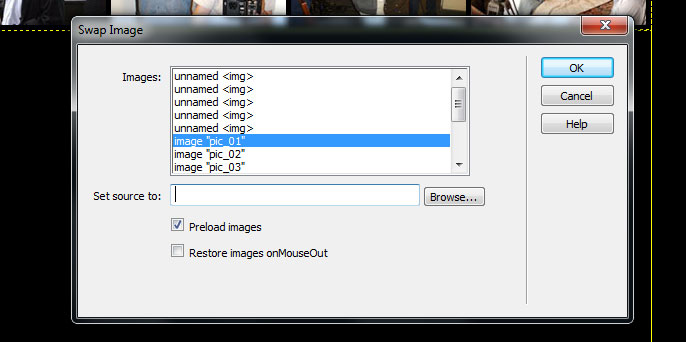
- Notice that there are five "unnamed" images above the ones you ID'ed. Those are the Oregon Film Festival Logo and the social media images (Facebook, Twitter, etc.). Since you aren't going to target those with JavaScript, you don't have to ID them, but it should be clear now why you ID'ed the ones you're working with in the first place -- it's not easy to tell which is which if you don't ID them!
- One after the other, click on a thumbnail image and do the following steps:
- Click the plus sign, then choose Swap Image from the Behaviors pull-down menu
- Select the image ID that corresponds with the blank image in div#mainimage
- Browse... and Set source to the larger version of the thumbnail image you selected -- in other words, if you click on thb_wr_day3_028.jpg, you would select the image named wr_day3_028.jpg as the image to swap to. (Note that their names are similar, though the thumbnail image has a "thb_" in front.)
- Leave Preload images checked
- Uncheck Restore image onMouseOut
- Repeat these bulleted steps for all other thumbnails
Instructor Note:
By leaving "Preload Images" checked you are ensuring that there is no delay when you move the mouse over the original image and it switches to the other image. In other words, if you don't preload images (uncheck this option), then the rollover image would have to load into the browser/computer's memory at the time you move the mouse over it. This would cause a delay on the rollover and it might be confusing to the user. When images are preloaded, they are loaded into the browser/computer's memory at the time the entire page loads (exactly the way all other images on the Web page load into the browser), thereby causing no loading delay when you mouse over the rollover image.
As for unchecking "Restore image onMouseOut", this is on by default, which means that once you move your mouse pointer away from the rollover image, it would immediately revert back to the original image. Normally, with only one rollover image, this might make sense. We have a whole gallery and each of the thumbnails swap to the larger image. Since the next swapping image already replaces the previous image, then there's no need to revert back to the blank original. Not only that, but it's somewhat jarring to have it flip back to the blank image as your mouse pointer moves in-between one thumbnail and the next. It would give you a very awkward strobing effect that would also be off-putting to the user. - Save the page and test it in a browser and you should see the disjointed rollover effect work as you hover over (mouse over) all the thumbnail images. Also, be sure to compare the layout to the image at the top of these instructions to ensure the row and column are in the correct locations.
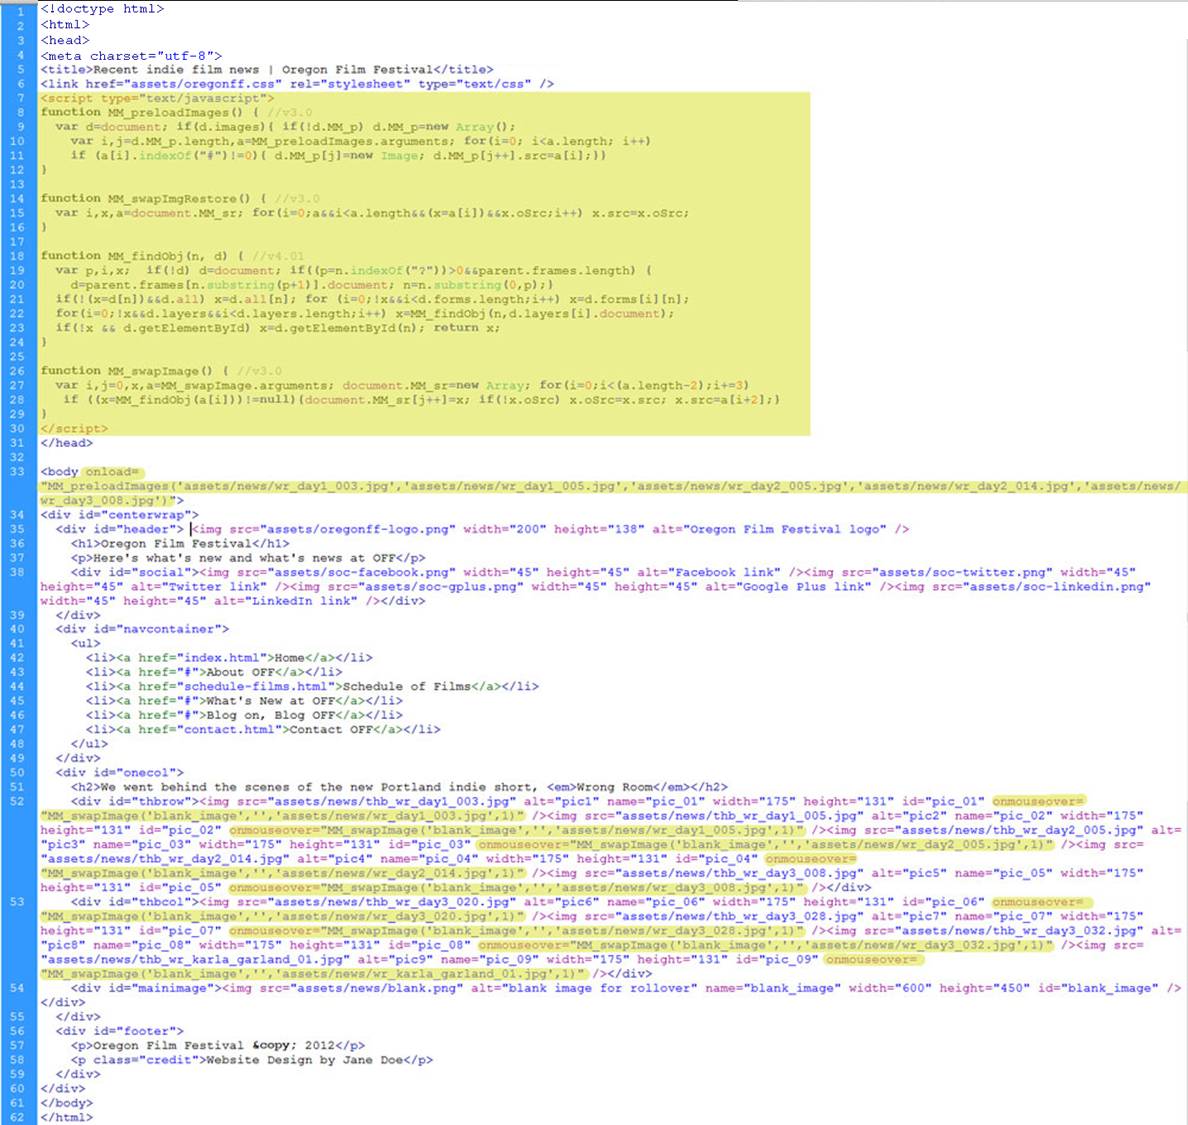
- What if it doesn't work? If the JavaScript isn't working, and if you aren't a JavaScript code writer, the best idea is to delete all the JavaScript code in the HTML (and all references to it) and start again. This isn't an obvious or easy prospect. Switch to Code view and look at all the new JavaScript code (highlighed in yellow in this image below):
- If you plan to start over -- AND DON'T DO THIS IF YOURS IS WORKING CORRECTLY -- you'll have to delete the JavaScript and related references to it above. These include:
- The script tag in the head tag area which houses the actual JavaScript. The entire tag including all the script inside (lines 7 through 30 highlighted above) should be deleted if you plan to start over.
- The onload event handler. This appears as an attribute in the body tag on line 33 in the above example. If you remove this, be sure to leave the body tag intact with it's opening and closing brackets.
- All the onmouseover event handlers (again these look like attributes) in the image tags. There are nine in a finished (shown highlighted above on lines 52 and 53), correct news-off.html page, but you may have more or less of them in an incorrect page. Be very careful to not delete the closing brackets of the image tags that the onmouseover.
- All onmouseout event handlers. These are not shown in the correct example above, but these would be present if you neglected to uncheck Restore image onMouseOut in the Swap Image dialogue window.
- Again, you should not plan to do anything described in Step 9 above if yours is working correctly.
Part 6: Saving and Uploading
- Save the files you just created to the SWS using the Site Definition we created in class.
- Upload oregonff folder to the SWS, which should include news-off.html and all the pictures inside the assets and news subfolder.
- Test this on the SWS with one or more browsers to make sure it functions properly.
- Mail your instructor using a subject like CAS 111d OYO5 Uploaded Your Name (where Your Name is your actual name).
Instructor Note:
As you should be in the habit of doing, be sure to use a browser (or more than one browser) to check your Web pages on the SWS to ensure everything works properly.