Overview
This is the fourth part of a multi-part project related to the fictional Oregon Film Festival site.
The owner of the Oregon Film Festival wants you to make the actual home page of their new website. This involves a four or five part process that is explained below in an overview (example) and then in the actual steps.
Here is what the finished Home page should look like:

This assignment is an overview of the proper process to designing and developing a typical website. The step-by-step instructions described in this assignment are the steps you will want to follow when designing most standard websites.
Overview -- Example
This is an overview of the proper process to designing and developing a typical website. The instructions to complete OYO 4 are below this overview, but take a look at the steps described in this overview. They are the steps you'll want to follow when designing most standard websites.
Website Design is best organized into these steps:
Part 1 - PLANNING
Either on paper, a dry erase board, in a document creation program like Microsoft Word or Microsoft PowerPoint, in a wireframing program like Microsoft Visio, or in a graphic design program like Adobe Photoshop or Adobe Illustrator, plan your website's typical page (usually the home page of your site). Be sure to mark off the rectangular quandrants or zones that the page can be divided into and give those zones names. Those zones will be the divs and their names will be their IDs. This layout is commonly referred to as a wireframe.
Linked is an example of a well-designed wireframe and another wireframe layout that includes pixel measurements for the divs.
Here is a sample of dummy text also known as lorem ipsum text if you need filler text for your wireframe.
Here's a really raw drawing of a wireframe concept, but hey, this works, too!

Part 2 - structure
Create the structure of your home (or first) page. This means insert the div tags on your home page. Just like they are your children, give all your divs unique names (using the ID attribute in the HTML). For example, if the upper left most div will be the container for your logo, then give it id="logo" as an HTML attribute.
You may want to give your divs some minimal styling at this point, such as giving them height, width, z-index, and a type of positioning (relative, absolute, or fixed). To do this part, create ID selectors in the CSS that correspond to their ID attributes in the HTML.
With Dreamweaver, it's easiest and more efficient to add the divs by hand-coding them in Code view.
Here's an example of a structure that goes with that raw wireframe drawing above:

Part 3 - Content
Add text or pictures into the divs as appropriate. Also, add a navigational bar (menu buttons) using an unordered list. Give the navbar ul an ID attribute in the HTML. Call it something like "navlist".
With Dreamweaver, adding text is easiest to do in Design view, and you can copy and paste text from other Web pages and documents into Design view and Dreamweaver automatically creates the underlying code. Images are usually easier to paste into the divs in Code view since you can't see them in Design view if they are unstyled.
Part 4 - Style the Page with CSS
It's best to start with tag selectors to provide the bulk of your styling. Then add ID selectors for the divs in the order that they appear in the HTML. Also, be sure to style the navbar as completely as possible including its descendant tags. Finally, create and apply class selectors if you need to make any exceptions to the style you created with the tag selectors. Give your class selectors names to describe their function and also names that you'll remember when you have to find them later.
With Dreamweaver, it's faster and more efficient to use the CSS Styles panel to create your selectors. Unless you have a really good memory for property names, it's best to find them in the CSS Rule Definition dialogue box in Dreamweaver.
At this point, you'll also want to externalize your CSS (put it in a separate and linked .css file).
Once you have a well structured and well styled home page, you can make copies of it for your other pages, then change the content on the new pages.
Part 5 - Scripting
This is typically done on a page-by-page basis. In other words, just add scripts (JavaScript), Spry (or other AJAX) on pages that need them. You may also want to create and test the server-side scripting files at this point especially if they provide password protection or a site search feature to your home page.
With Dreamweaver, you can use the Behaviors button (under the Tag Inspector panel) to access the JavaScript that's built-into Dreamweaver. The Spry (which is Adobe's version of AJAX) can be accessed under the Insert menu or panel.
After you finish scripting as needed, then all you'll have to do is update the navbar links to all pages. Voila!
Working on your Oregon Film Festival Site
Now that you've read the overview, you can begin work on the Oregon Film Festival site and follow the steps as described in the overview.
Part 1 - Planning
For the Oregon Film Festival site, we'll start by planning a regular Web page.You have a simple page with content and basic style (created in OYO 3), and now you'll do the actual work of creating a working home page for your site complete with structure, content, and style.
Here's the wireframe (made in PowerPoint) of the Oregon Film Festival home page you'll create:

Note that the box "logo image goes here" will not be a div, but the actual image itself. All the other boxes, including the container box that goes around everything else, will be div tags.
So, in total, you'll have 7 divs for your structure. In these instructions, they'll be referred to by the name you see above or by their shortcut name: div#centerwrap, div#header, div#social, div#navcontainer, div#leftcol, div#rightcol, and div#footer.
Part 2 - Structure
Now that you see what you're goal is (in the wireframe above), you'll be able to create the structure following the steps below.
- Create a new HTML page and save it with the name index.html in your oregonff folder, NOT in the assets subfolder.
Instructor Note:
index.html is the traditional filename for a site home page. It's a special filename that causes the browser to automatically load that page when you go to the site root folder (the URL) in the address bar of the browser. In other words, when you type in a URL, it automatically loads the index.html page that is sitting in the site root folder.
Other names have been used in the past, such as home.html and default.html (or default.asp). You can use the name index with other extensions (such as .shtml and .php). The server software (most commonly Apache or Windows IIS) does allow you to configure whatever name you want, but by default, the name index.html has priority. It's best to stick with index.html as your home page name. - With index.html open, go to Code view if you aren't already. You'll create the divs by typing them directly in Code view.
Instructor Note:
There are other ways to insert divs using Dreamweaver, but these are for people who don't understand how structure works. These other methods are more time-consuming and potentially confusing if you know what you're doing. By now, you've already been exposed to structure and div tags, so you should, from this point on, only type them directly in the code. - Start by typing in div#centerwrap in the HTML body tag area. In the HTML code, it will look like this:
<div id="centerwrap">
</div>
Instructor Note:
The ID (id attribute) is always followed by the equal sign and the value, in this case the name of the div. Remember, id attribute values (the name of the div) can only be used once on a page. In other words, if you have a div ID'ed as "centerwrap", you can't have another div with that same ID.
This should make sense. Think of divs as your babies and each should have a unique name to identify it when you style it later. Ok, maybe you don't want to think of them as your babies, but the rule that they are unique still applies... - All the other divs should go inside (i.e., be nested inside) div#centerwrap. By "inside", that means between the opening and closing parts of the div#centerwrap tag. Be sure to type them in order as you see them in the wireframe, top to bottom, left to right.
- Also, note that div#social should be nested inside div#header.
- After you type the code, click the Format Source Code button (on the lower left of the toolbar in Code view as shown in the image below) then choose Apply Source Formatting from the pulldown menu that appears to properly indent your code for readability. This is an important "best practice" in Web design so that other people who view your code can read it more easily. Also, doing this will point out if there are any nesting errors in the code (such as things like missing closing tags).

- Here's what the code should look like after you choose Apply Source Formatting. If it doesn't look like the image below, then there's likely a missing div closing, or another typo. Carefully read through the code (or retype the entire section) to make it look like this:

- Notice that div#social is indented further than the others because it's inside div#header, which is inside div#centerwrap. div#header, div#navcontainer, div#leftcol, div#rightcol and div#footer are all at an equal level of indention (2 spaces) because they are all nested inside div#centerwrap and not within each other.
- Save index.html page.
Part 3 - Content
Prior to starting this part, be sure to download all the remaining assets for the Oregon Film Festival site. To do this, go to the link Course Files on the course main navigation bar, then into the oregonff/assets folder. Right click on each image and Save Link... or Save Target As... (depending on what your browser calls it).
Instructor Note:
Just to be clear, you can't drag and drop files from a Web server to your own computer or USB thumb drive. You must right click on them and save the files. If you attempt to drag and drop them, all you'll get is a shortcut link to the image. It might appear to work, but it didn't really work...
Follow these steps to add content to your page. We'll start by adding text content, then add the image content afterward.
- Open the index.html file if it isn't already.
- Switch to Design view from Code view. Notice that you can see a long dashed rectangle only in Design view. This indicates there are divs there, but they have no content in them, so you can't see them or individually choose them, so you really can't do anything in Design view yet.
- Switch back to Code view.
- Type or copy and paste the title text "Independent films and filmmakers venue | Oregon Film Festival" (no quotes) into the Title: box on the Document toolbar, or directly into the title tag in the code -- you'll replace the placeholder text "Untitled Document".
- Click into div#header, but not into div#social. This means, you should place your cursor just after the opening tag of div#header -- as indicated by the standing line right after the opening tag:
<div id="header"> - Switch back to Design view, but DON'T click anywhere. Just begin typing "Oregon Film Festival" (no quotes). At first, you won't see where you're at, but once you begin typing, the letters will appear.
- Click anywhere on the sentence "Oregon Film Festival" and set it as an h1 (Heading 1).
- Press Enter (or Return) then type or copy and paste "The sophisticated festival for discerning filmios" (no quotes).
- Switch back to Code view.
- You should see an h1 as the first line in div#header, followed immediately by a paragraph (p tag), followed by div#social, all of which are inside div#header.
- Copy and paste the following list inside div#navcontainer -- again the best way to do this is copy the ul below, click inside div#navcontainer in Code view, then switch back to Design view, then paste:
- Home
- About OFF
- Schedule of Films
- What's New at OFF
- Blog on, Blog OFF
- Contact OFF
- Switch back to Code view. If you did it correctly, you'll see the ul properly nested (and indented) in div#navcontainer. If it doesn't look right, Undo and try again.
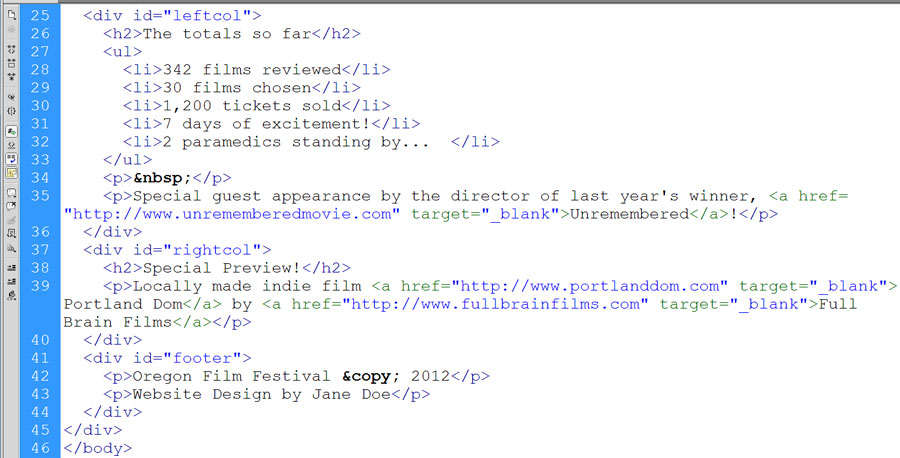
- In div#leftcol, type or copy "The totals so far" (no quotes) and set it as an h2.
- Under the h2 in div#leftcol, copy and paste the following ul:
- 342 films reviewed
- 30 films chosen
- 1,200 tickets sold
- 7 days of excitement!
- 2 paramedics standing by...
- If there isn't a blank paragraph -- a p tag with a non-breaking space code in it, which looks like -- after the ul you just pasted, go ahead and hit enter twice to create one.
Instructor Note:
When you press enter (return) in Design view, it creates a p tag with a non-breaking space <p> </p> in the code. If you press enter (return) in Code view, it only creates an extra line. Be sure to switch to Design view to create those extra paragraphs quickly -- either that or you have to type them in the code, which isn't a terrible thing, it just takes more time. - Right now, here's what the code should look like in the body section:

- In Design view, click in the empty paragraph, then press enter (return) to make a new paragraph with a non-breaking space code in it. In other words, there will now be two empty paragraphs. The first one we'll reserve to drop in the image later.
- In the second blank paragraph in div#leftcol, type or copy "Special guest appearance by the director of last year's winner, Unremembered!"
- Make the word "Unremembered" an absolute link to http://www.unrememberedmovie.com and set the target as _blank.
- Type or copy into div#rightcol "Special Preview!" (no quotes) and set it as an h2.
- With your cursor still in div#rightcol, press enter (return) and type or copy "Locally made indie film Portland Dom by Full Brain Films" (no quotes).
- Make the words in that last paragraph "Portland Dom" an absolute link to http://www.portlanddom.com and set the target as _blank.
- Make "Full Brain Films" an absolute link to http://www.fullbrainfilms.com and set the target as _blank.
- In div#footer, type or copy "Oregon Film Festival © This Year" (no quotes and where This Year is the current year). Be sure to use the code for the copyright symbol. It's © and you have to put that in the proper place in Code view.
- Press enter (return) to create a new paragraph.
- In div#footer under the previous paragraph, type or copy "Website Design by Your Name" (no quotes and where Your Name is your actual name).
- Right now, Code view for div#leftcol, div#rightcol and div#footer should look similar to this (although your name and the year may be different):
Instructor Note:
You'll notice another closing </div> after div#footer closes. Remember, that's the close to the container div#centerwrap. Don't let it confuse you and definitely don't delete it! - Stay in Code view.
- Drag and drop oregonff-logo.png from the assets folder in the File panel to just before the opening of the h1 tag in div#header. Give it an alt text of "Oregon Film Festival logo" (no quotes). CAREFUL! Be sure that the img tag is above the h1 tag in the code and NOT inside it.
- Stay in Code view (you'll need to do this because you can't see div#social in Design view.
- One after another, drag and drop the following images in this order into div#social: soc-facebook.png, soc-twitter.png, soc-gplus.png, soc-linkedin.png. Give them all appropriate alt text, like "Facebook link", "Find us on Facebook", etc.
- Drag and drop unremembered.jpg into the blank paragraph in div#leftcol. This should be the one you left just above the paragraph that begins "Special guest appearance...". Give it alt text of "Independent film Unremembered." (no quotes).
- We'll now add the preview trailer described in div#rightcol. To do that, go to where the Portland Dom Trailer resides on YouTube.
- In YouTube, look beneath the video window (you should not have the video on full screen so you can see below it). You should see a Share button. Click it.
- You will then see sharing options appear. You should see an Embed button. Click it.
- The video should be defaulted to a size of 560x315 (width is always listed first, then height in sizes - the units are assumed to be in pixels for images and video). Choose this size if it's not already displaying that.
- Copy the embed code YouTube provides you. The code likely looks something like this:
<iframe width="560" height="315" src="http://www.youtube.com/embed/sL2AuGXmsto" frameborder="0" allowfullscreen></iframe>
- Note that the code is an HTML iframe. These are covered in greater detail in CAS 211, Intermediate Website Creation.
- Paste the code YouTube provided you into div#rightcol just after the p tag closes and before the div tag closes. It should appear similar to this in Code view (although because the font size on this Code view window is larger, it may be text wrapping differently in your Code view -- this is not a problem):

- In Design view, the iframe looks like a gray box. When you preview the page, you'll see it pull in the content (from YouTube in this case) inside that box.
Instructor Note:
An iframe, or inline frame, is basically a hole or portal window in your Web page. Through it you can view other Web pages, including ones on your local site or any other external site. Iframes are one of the only frame elements still widely in use on Web pages and there are still many good uses for them, as you can see with this YouTube video. - Give all the list items in div#navcontainer a null link (#). To do this, you click anywhere in the list, then click the ul tag on the status bar, then type a # sign in the Link box in the Properties panel, then press enter (return).

Instructor Note:
This is a common strategy to give links an a tag even though you don't have an actual page to send them, too. One major reason to do this is that you may need to style the a tag later to make it look like a button -- you can't do this with the li tag alone. A null link (or nothing link) is a pound sign, which basically means to the browser "stay on this page when clicked". It also doesn't cause the Web page to reload in the browser, so it won't be confusing to the user when it does nothing when clicked. It looks like a link, it feels like a link, but it just does nothing! - Change the link for What's New at OFF from # to a Web page that doesn't exist (yet) named news-off.html
Instructor Note:
It's a very good idea to use page names instead of null links when you can. In other words, as part of the planning process, when you create the sitemap, would be to give all the pages file names at that point. If you can give them links on the navbar early on, then, when you make copies of the first page for all the other pages, then the links are correct already. If you don't do this, and just have null links, then later you'll have to update the links on ALL page of your site one at a time.
Of course, null links are better than no links at all, so if you haven't planned out your page names, go with null links instead. - The news-off.html file will be created in OYO 5.
- Change the link for About OFF from # to about-oregon-film-festival.html -- this file you already created in OYO 3.
- Change the link for Schedule of Films from # to schedule-films.html -- this file will be created in OYO 6.
- Change the link for Contact OFF from # to contact.html -- this file will be created in OYO 7.
- Save the index.html page.
- Preview the page in a browser. At this point, it has no style, but it should look similar to this in most browsers:

Part 4 - Style the Page with CSS
- Close the index.html page if it's currently open, then open up about-oregon-film-festival.html that you completed in OYO 3.
- In Code view, notice that it contains embedded CSS style. We'll go ahead and lift this style out of this document and use it as the basis of our Oregon Film Festival home page, index.html.
- Look at the CSS Styles panel on the right hand side of Dreamweaver (open it up if you don't see it) and be sure to click on the All tab. You should see the tag selectors we created in OYO 3. By using Page Properties...
- Notice the first selector group called h1, h2, h3, h4, h5, h6. It's a group of tag selectors that share the same properties. It's why they've been lumped together by Dreamweaver in one big selector group.
- Click on the h1, h2, h3, h4, h5, h6 group. It should look like the image below:

- Look in the bottom part of the panel and notice that the selector group you selected shares the same font-family (beginning with Verdana) and font-weight (bold).
Instructor Note:
It's actually not necessary (or even desirable) to create your CSS beginning with Page Properties... in the Properties panel as we did in OYO 3. We did that because that lesson occurs before you learned more about CSS. It tends to create additional and unnecessary tag selectors (like the h1, h2, h3, h4, h5, h6 one and you'll probably never even use an h5 or h6 in your Web design).
Now that you have a greater comfort level using the CSS Styles panel, you should start with that. To create new style in that panel, you click the + document sign.
This figure below shows you the buttons at the bottom of the CSS Styles panel and describes their functions.

- Note that all the selectors currently in the CSS for the about-oregon-film-festival.html page are tag selectors. Using the Page Properties... button in the Properties panel will only create tag selectors. Remember that class selectors begin with a period in the CSS, and ID selectors begin with a # sign in the CSS.
- Also note that the selectors are embedded in the HTML page. You see a <style> tag at the top of the CSS Styles panel All tab. If they were linked, you'd see a .css file name instead. If we want the index.html page to share the style, we'll have to externalize it -- in other words, move it to its own CSS file.
- Click the h1, h2, h3, h4, h5, h6 selector group (if it isn't already).
- Hold the shift key on the keyboard, then click the body selector in the CSS Styles panel. It will look like this:

- Right click on any of the selected selectors, and select Move CSS Rules... from the shortcut menu.

- Choose "A new style sheet..." from the dialogue box that appears. Since we are moving these selectors into a new CSS file, that's our choice. (If we were moving them into an existing CSS file, then we'd browse for it with the first choice.)
- Click Ok.
- Browse to the assets subfolder of oregonff. That's where we'll place the CSS file since it's not a Web page. (Web pages tend to be placed in the root folder of your site, whereas CSS files and images tend to be referred to as assets by most designers.)
- Give the CSS file the name oregonff.css as shown in this image below:

- Click Save.
- Now, look at the top left of the Design view window at the name tab of the Web page. Notice you have a new style sheet file under the name. Also note -- AND THIS IS CRITICAL -- both the Web page about-oregon-film-festival.html and oregonff.css have asterisks * next to their names. It means both documents are unsaved.

- Go to File and choose Save All.
Instructor Note:
More students lose all their style at this point because they don't realize that, from this point forward, they are working with two documents, the Web page and a linked CSS file. Save All from the File menu item will save any unsaved documents that are currently open. Do this, and get in the habit of doing it often. - Switch to Code view. You'll now see some new code. A link tag contains the link to the CSS file (line 8 in the code below). The style tag is still there (lines 6 and 7 below) -- it held the embedded CSS selectors before we moved them. The style tag is now style-less -- it contains no selectors and has no other purpose on this page.

- You can (and should) delete the style tag (both the open and the close parts). To do this quickly with Dreamweaver, select the <style> tag in the CSS Styles panel All tab, then click the trash can (looks like a cupcake in the lower right of the CSS Styles panel window!). By the way, you can't drag and drop anything to this trash can -- you have to click the tag/selector, then click the trash can.

- Also note that in the CSS Styles panel, you'll see the name oregonff.css file name above the selectors. This indicates that the selectors are now contained with this external (linked) CSS file.
- Switch to Code view.
- You'll now see the HTML code of your Web page.
- Click the oregonff.css name next to Source Code just below the Web page file name tab in the upper left of the Code view window. The red arrow points to it in this image:

- You'll now see the CSS code of the linked CSS file.
- Click on Source Code.
- You'll again see the HTML code. You can switch back and forth between the two codes (the HTML Web page and the linked CSS file) using this method.
Instructor Note:
This is a big WARNING! -- when you use Undo, you are undo-ing whatever you last did in the Design or Code view window that's currently open. In other words, if you want to undo something you just did in the CSS Styles panel, you'll have to switch to Code view, and click on the .css file just under the Web page file name tab, THEN click undo. If you're not careful here, you'll undo the last thing you did in the HTML instead of the CSS.
This can be confusing, but just remember -- YOU'RE WORKING WITH TWO DOCUMENTS NOW!
Yes, I am shouting at you. - Close the about-oregon-film-festival.html page.
- Open the index.html page.
- Go back to Design view.
- Notice in the CSS Styles panel All button, it says "(no styles defined)" which means there is currently no CSS style on this Web page.
- Click on the Attach Style Sheet button in the CSS Styles panel. It's the one that looks like a chain link and is labeled in the image below as "Link to a style sheet":
- Browse to find the oregonff.css file you created previously and saved in the assets folder.
- Click Ok.
- You should see the style from OYO 3 appear in your index.html page. This goes a long way to making it look more like a regular Web page.
- You'll now create several selectors using the New CSS Rule button at the bottom of the CSS Styles panel. This is the method you'll usually use to create CSS since Dreamweaver automatically provides you with the right names and properties of many selectors. This is another great efficiency feature of the Dreamweaver program. In this image below, the New CSS Rule button is the + document button pointed out by the label Create New Style Sheet:
- Create your selectors. You'll click the + document button, then choose Selector Type from the pulldown menu. Do Tag selectors first, then create ID selectors for your divs, then create Class selectors, then end with Compound selectors (they are listed in the order you should enter them in the table below). When you choose the properties for each selector, you'll find them in specific windows under the Category menu on the left side of the CSS Rule Definition window.
- Create all of the selectors as follows and watch what happens to your page in Design view after you create each one:
- Tag selector with the name * (type in an asterisk - Shift+8 on the keyboard - as the first selector type) and click Ok. Go to Box to set margin: 0;
Instructor Note:
The asterisk (*) is known as a wildcard and is used to indicate ALL tag selectors. In other words, you are using the asterisk to indicate you want the properties that go with it to be applied to ALL tags in the HTML. In this case, you're going to indicate that a 0 margin (no margin in other words) will be applied to all tags in the HTML. This will have an immediate effect. All the double spacing that you see with p tags and h1, h2, etc. tags is caused by margin. Setting them to a margin of 0 will remove the double spacing effect!
When you see margin: 0; listed like that, it means the margin for all sides, so leave "Same for all" checked above the Margin in the Box category window. - Tag selector with the name p and click Ok. Go to Type to set color: #FF3;
- Id selector with the name #centerwrap and click Ok. Go to Box to set width: 900px; margin-left: auto; margin-right: auto;
Instructor Note:
Setting the container div, #centerwrap, with an A) width in pixels, B) margin-left of auto, and C) margin-right of auto causes it to center in the browser window -- specifically the auto left and right margins cause a tug-of-war situation for the container within the browser window effectively canceling each other out and leaving the div sitting in the exact center of the window. Much like the majority of sites on the Web, this is a very typical fixed-width layout. Bear in mind, that when you create your own fixed width sites, you'll very likely use a width in pixels and left and right auto margins. - Id selector with the name #header and click Ok. Go to Box to set height: 100px; padding-top: 10px; padding-bottom: 10px; margin-top: 10px;
- Id selector with the name #navcontainer and click Ok. Go to Box to set height: 60px;
- Id selector with the name #leftcol and click Ok. Go to Box to set width: 320px; float: left;
Instructor Note:
The float: left; property causes a div that has a width to be knocked out of text alignment with the other elements (tags and content) on the page. The purpose of doing this is to create columns. There is no better and more commonly used method of creating columns in Web design. The downside is that knocking a div out of text alignment causes the divs below it to rise up and possibly under the div you knocked out of alignment. Notice how the content in div#footer appears to have risen up and directly (and awkwardly!) below div#rightcol. - Id selector with the name #rightcol and click Ok. Go to Box to set width: 570px; padding-left: 10px; padding-top: 50px; float: right;
Instructor Note:
Left and right padding add to the width of a div (as odd as that is!). So, if your div has a width, like div#rightcol does (580px on the wireframe), then subtract the amount of padding-left (10px) from the width, leaving you with a width of 570px. - Id selector with the name #footer and click Ok. Go to Background to set background-color: #295A33; Go to Block and set text-align: center; Go to Box and set height: 40px; padding-top: 5px; padding-bottom: 3px; clear: both;
Instructor Note:
Using the clear: both; property cancels the float affect on div#footer. This makes it so div#footer will not awkwardly rise up and under the floating divs. You will ALWAYS have to give the div just below the divs that are floating the clear: both; property so it doesn't behave strangely and stays put beneath the floating divs. - Id selector with the name #social and click Ok. Go to Box to set float: right; margin-top: -50px; (yes, that's minus 50px!) and margin-right: 30px;
- Class selector with the name .credit and click Ok. Go to Type to set font-size: small; font-style: italic;
- Compound selector with the name #navcontainer ul li and click Ok. Go to Block to set display: inline; Go to List and set list-style-type: none;
Instructor Note:
Compound selectors are actually referred to as descendant selectors in the real world (you know, outside of the Dreamweaver program). A better name for them would be "nested selectors" because they are really a group of selectors, separated by spaces, with the selector on the right nested inside the ones on the left. In the case of this descendant, #navcontainer ul li (and there must be a space between each of these three selectors), the properties you create will only affect the li tags within the ul tags within div#navcontainer. Notice that, after you Ok this one, that only the bulleted list in div#navcontainer is affected. The bulleted list in div#leftcol is not. By using descendant (compound) selectors, you can style only the very specific tags that reside in a specific div. Powerful! - Compound selector with the name #header img and click Ok. This will affect ALL images in the header including those in div#social. Go to Box to set float: left; margin-right: 10px;
- Compound selector with the name a:link and click Ok. Go to Type to set color: #F90; font-weight: bold; text-decoration: none;
Instructor Note:
Although a:link is really a type of tag selector, it must be entered in as a compound. Actually, any tag that's followed by a colon (:) with NO SPACES like a:link or a:visited is properly referred to as a pseudo-class selector. It's not really a tag selector because it's only one state of the a tag, and it's not really a class or any other selector, so they call it "pseudo" or "false" class selector. Come to think of it, I'm sure there is a better name if they would have thought about it for a while... - Compound selector with the name a:visited and click Ok. Go to Type to set color: #FF3; font-weight: normal; text-decoration: none;
- Compound selector with the name a:hover and click Ok. Go to Type to set color: #FFF; font-weight: bold; text-decoration: underline;
Instructor Note:
This is an important quirk in Web design, and it's important to bring it up now. When you use a:link, a:visited, a:hover, and a:active (though this last one is rarely used), these selectors MUST stay in this order, top to bottom, in the CSS code. In other words, a:link must be placed first before a:visited and a:visited must precede a:hover. If you don't leave them in this order, they will likely not style the a tags correctly. To remember this order, you can think of the first letters of these pseudo-class selectors (LVHA). These letters appear in this order in the words LoVe-HAte. So, a tag pseudo-class is really a LoVe-HAte relationship. Ha ha...? - To the h1 tag selector (and only that tag selector, not the group h1, h2, h3, etc.) in CSS Styles, edit it to include margin-top: 20px;
- In Design view, click after the list item "2 paramedics standing by..." and press enter (return) twice to create an extra p tag with a non-breaking space. This will separate the list item from the image below it -- it really was looking a little crowded there.
- In Design view, click after the paragraph in div#leftcol that ends with "...year's winner, Unremembered!" and press enter (return) once to create an extra p tag with a non-breaking space.
- Preview this site in a browser now and make sure your links have a proper hover effect. Also, you can test that the video embedded from YouTube works, too.
- Apply the class selector .credit to the paragraph of text in the footer that starts with "Website Designed..." -- do NOT apply it to the copyright paragraph. To apply a class selector to a paragraph, be in Design view, click on the paragraph, select the <p> tag on the status bar, then choose the class from the pulldown menu Class in the Properties panel. Or you can right-click on the <p> tag and choose Set Class from the shortcut menu that appears, and check credit from there. Note that in the HTML Code view, referring to a class selector like credit, you will not see a period at the beginning - that's only in the CSS (and as a shortcut notation on the status bar, too).

- Copy the following code for the navigational bar and paste it just below your #navcontainer selector in your CSS code. Be careful not to paste it into the lower curly brace in the #navcontainer selector. (If you see two closing curly braces at the bottom of your pasted section, then you've done it wrong.)
- Re-order the selectors by dragging them around in the CSS Styles panel until they are in the order of the ones in this image:

Instructor Note:
I personally like tag selectors to be listed first, since they are the general style rules of the page. I then always put ID selectors next (in the order you'd find them in the HTML), followed by the compounds that go with each ID'ed div. Then I end with class selectors since they are exceptions to the general rules I created (the tag selectors) and are usually fairly rare in the CSS.
Also, be very careful to keep the a:link, a:visited, a: hover, and a:active ones IN THAT ORDER as described in #9 of the Instructor Note just below the selectors table above.
- There are a couple of things to spruce up, that are fastest to do by adding blank paragraphs.
- Go to File menu and click Save All.
- Now, preview this page in a browser and bask in the glory of your accomplishment (well, only bask though if it looks like the one below!):
#navcontainer ul
{
text-align: center;
padding-bottom: 5px;
padding-top: 5px;
padding-left: 0;
margin-top: 0;
/* cancels gap caused by top padding in Opera 7.54 */
margin-left: 0;
background-color: #295A33;
color: #FF0;
width: 100%;
font-family: Arial,Helvetica,sans-serif;
line-height: 1em;
/* fixes Firefox 0.9.3 */
}
#navcontainer ul li
{
padding-left: 0;
padding-right: 0;
padding-bottom: 5px;
/* matches link padding except for left and right */
padding-top: 5px;
font-size: .8em;
}
#navcontainer ul li a
{
padding-left: 10px;
padding-right: 10px;
padding-bottom: 5px;
padding-top: 5px;
color: #FF0;
text-decoration: none;
border-right: 1px solid #fff;
}
#navcontainer ul li a:hover
{
background-color: #369;
color: white;
}
#navcontainer #active
{
border-left: 1px solid #fff;
}
Instructor Note:
This additional code for the navigational bar originally came from the Listamatic website (and I modified the colors). This is a community CSS site where designers share their CSS code for styling interesting navigational bars. The code is free for you to use, copy and modify (as is all CSS code because it's open source). Check out some of the unique navbars and see if you can make use of them in your own designs!
Final Tasks:
Upload both files to the SWS using the Site Definition we created in class. Always remember to avoid, file management chaos.
Mail your instructor using D2L email with a subject like CAS 111d OYO4 Uploaded Your Name (where Your Name is your actual name)
Instructor Note:
Be sure to use a browser (or more than one browser) to check your Web pages (or document) is on the SWS.