The proper process to designing and developing your website is best organized into these steps:
- Planning the Page Layouts: flowchart/ sitemap and wireframe diagram
- Structure: div tags and html tags, code view
- Content: text and images, code and design view
- Styling: css
- Scripting (optional): javascript, php, etc. Adding behaviors or database.
- Testing & Revision
1. Planning the Page Layouts
The following are common steps to planning your specific page layouts.
a. Consider Other Sites that are Like Yours
It may be helpful to research other sites that are like the one you will be creating, either in content or desired style or both.
b. Determine your Color Scheme
Make a list of the major colors that will be included in your site. These include colors for the page body, the heading and other fonts, and background colors of the sectioning elements.
c. Plan your Home Page
Either on paper, a dry erase board, or in a graphic design program like Photoshop, plan your website's typical page (usually the home page of your site). Be sure to mark off the rectangular quandrants or zones that the page can be divided into and give those zones names. Those zones will be the divs and their names will be their IDs. This layout is commonly referred to as a wireframe.
Below is an example of an artistic wireframe:

and another wireframe layout that includes pixel measurements for the divs.
Here is a sample of dummy text also known as lorem ipsum text if you need filler text for your wireframe.
Here's a really raw drawing of a wireframe concept, but hey, this works, too!

In addition to the sectioning element names, effective Wireframes may include
- the width and/or height of sectioning elements, especially the container width
- amount of margin and padding of the sectioning elements
- colors and/or the color numbers for the color scheme
You should create one wireframe that represents all of the pages of your site. If your site has alternate layout, then you may need to create more than one wireframe to represent all the pages. In other words, if most of the pages of your site are in a two-column layout, then one wireframe should be created for those page, but if there are a few pages on your site that employ a four-column layout, then it may be necessary to create an additional wireframe layout for those pages.
Below is an example of an effective wireframe that includes much of the relevant information that will allow you to properly code the page:

2. Structure
This means coding in the actual HTML of all the sectioning elements. You should:
- Create and save an HTML file, typically for your home page first, which you'll likely name index.html.
- Type in the div tags and other HTML5 sectioning tags if you are using them. Just like they are your children, give all your divs unique names (using the ID attribute in the HTML). For example, if the upper left most div will be the container for your logo or banner, then give it id="logo" as an HTML attribute.
- You may want to give your divs some minimal styling at this point, such as giving them height, width, and type of positioning (relative, absolute, or fixed). This would have to be done in the CSS and is NOT recommended at this stage (See "Part 4 -- Style" below).
- Double-check the accuracy of your coding to ensure that all your tags are nested properly, closed, and include proper grammar.
The term cascading refers to which of these takes precedence when it comes to styling a page, a line, or any other element on the page. Usually, the closer to the HTML element, the more power it has. This means that inline style will trump embedded style which will trump linked style. However, the rules that are followed regarding precedence are long and complex, and inline style is not necessarily the best choice in most cases.
The goal for most Web designers is to avoid using inline and embedded style, and move the style information to a separate .css file so that it can be linked to many Web pages. By linking multiple Web pages to one .css file, style changes can be made more quickly to the entire website.
Create the structure of your home (or first) page. This means insert the div tags on your home page. Just like they are your children, give all your divs unique names (using the ID attribute in the HTML). For example, if the upper left most div will be the container for your logo, then give it id="logo" as an HTML attribute.
You may want to give your divs some minimal styling at this point, such as giving them height, width, z-index, and a type of positioning (relative, absolute, or fixed). To do this part, create ID selectors in the CSS that correspond to their ID attributes in the HTML.
With Dreamweaver, it's easiest and more efficient to add the divs by hand-coding them in Code view.
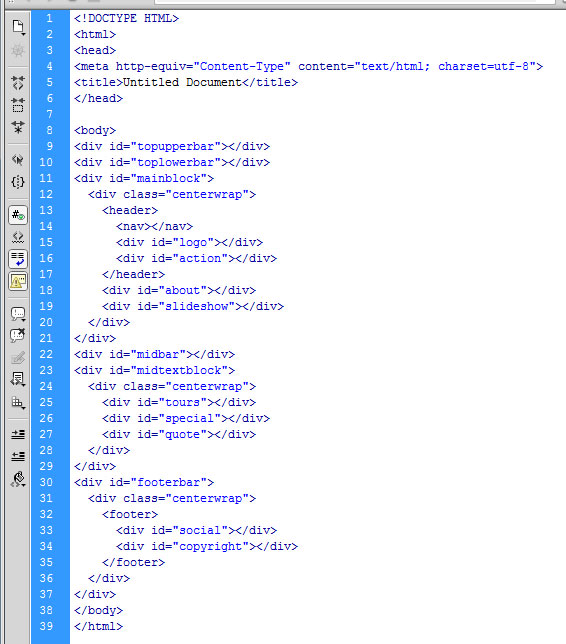
Here's an example of a structure that goes with that simple wireframe drawing above:

For the wireframe model shown just before the Part 2 heading, this is what the page structure looks like in the HTML:
3. Content
At this stage, you should add all the content to the structure you created in Part 2. Content includes:
- All the text for the page, including the title text, and any meta keywords or descriptions used for SEO.
- The navigation bar text which should be in an unordered list.
- All the images including the logo and social media icons, and the image alt text.
- Placeholders for images that don't currently exist, but that will be added to the page later or for slideshows and other JavaScript animation you'll add later.
- Video and audio files, if applicable.
- Flash animation .swf files or placeholders for those if they are banner ads, if applicable.
Add text or pictures into the divs as appropriate. Also, add a navigational bar (menu buttons) using an unordered list. Give the navbar ul an ID attribute in the HTML. Call it something like "navlist".
With Dreamweaver, adding text is easiest to do in Design view, and you can copy and paste text from other Web pages and documents into Design view and Dreamweaver automatically creates the underlying code. Images are usually easier to paste into the divs in Code view since you can't see them in Design view if they are unstyled.
All content should be added prior to proceeding to Part 4 -- Style. If you do not add all the content before your begin styling the page, it is likely you'll have to go back and forth between Part 3 and Part 4, making the work take twice as long (at least) to create the page.
4. Style the Page with CSS
After adding content, you can create the CSS, and you should save the .css file and establish a link to your HTML immediately.
The best order to doing your style is debatable, however, the following order makes sense and is a good model to follow:
- Import a reset.css stylesheet into your main stylesheet if you plan to use one.
- Tag selectors (these are going to apply the bulk or general rule of your style) following this order:
- * (asterisk), if applicable
- body
- h1
- h2
- Other heading tags h3-h6, if applicable
- p
- ul, ol and li
- a and related pseudo-class (and remembering to keep it in order of a:link, a:visited, a:hover, a:active)
- div or span tags that you plan to style in bulk
- em, strong
- any other tags that you plan to use frequently and which will require style
- ID selectors or sectioning element tag selectors that make up your structure. Place these in order as they appear from top to bottom, left to right in the HTML
- Descendant selectors. These should be placed after the div ID selectors or sectioning tag selectors they belong to.
- Class selectors (best to use as exceptions, highlights and emphases on the selectors you created earlier). Give these unique and memorable names that indicate their functional use and NOT their style. A good name is ".copyright" if it will be applied to the paragraph that contains the copyright text. A bad name is ".redfont" since you may decide that the paragraph you are using .redfont for as emphasis will be changed to a different color later.
- Create the CSS3 media query sections of your stylesheet as relevant for a responsive/ mobile friendly design.
With Dreamweaver, it's faster and more efficient to use the CSS Styles panel to create your selectors. Unless you have a really good memory for property names, it's best to find them in the CSS Rule Definition dialogue box in Dreamweaver.
At this point, you'll also want to externalize your CSS (put it in a separate and linked .css file).
Once you have a well structured and well styled home page, you can make copies of it for your other pages, then change the content on the new pages.
5. Scripting
This part is about putting JavaScript on the page for a rotating image slideshow, connecting a form to a server-side script like PHP, etc. This tends to be complicated since it may involve programming although frequently the code already exists out there so it may just be a matter of code-lifting and placing it properly within the HTML.
It's likely you'll want to do this on a page-by-page basis later, however, if you know the site is going to have the same script on every page (like for a local search engine, Google analytics code, an HTML5 shiv, etc.) then do this on your template page at this stage. Include client-side scripts (JavaScript), Spry (or other AJAX), and set your form actions to whatever server-side script files they will be referring to. You may also want to create and test the server-side scripting files at this point especially if they provide password protection or a site search feature to your home page.
Once you have a well structured and well styled home page, you can make copies of it for your other pages. Then all you'll have to do is make changes the content. Voila!
6. Testing & Revision
Be sure to do some or all of the following tests or research on your site to determine its effectiveness and usability:
- Test the navigation bar and other links throughout the site.
- Usability tests with multiple people including those unfamiliar with the site who are in the target audience.
- Performance tests include speed and server accessing benchmarks.
- Analytics and who the visitors are and where they are coming from.
- Search engine ranking.
After testing, you will likely have to revise the website to improve its effectiveness.