This page contain the following:
- Creating the Site Definition for current version of Dreamweaver
- Creating the Site Definition for Dreamweaver CS5 or CS5.5
- One Site Definition Per Server
- Cloaking, export and import your Site Definition
- Uploading Files and Folders to the SWS using Dreamweaver
- Uploading Files and Folders to the SWS using Filezilla
- Problems uploading with the Site Definition
Site Definition
The Site Definition is one of the most important aspects of how Dreamweaver functions. Once you have created a Site Definition, Dreamweaver knows
- where on your computer or USB drive the files (Web pages and assets) are located that you will be working with
- AND it knows what folder on the server to upload those files into when you are ready.
Why is this important?
Because Dreamweaver remembers how everything within the Site Definition is linked together. And by "links", that means any tags that use the href or src attributes. That would include links to other Web pages, links to images, links to the CSS file, links to Flash or other embedded assets, and links to JavaScript files which include the Spry features that come with this version of Dreamweaver.
If you work outside a Site Definition, be prepared to have your links scrambled and not functional once they are uploaded to the server. Even though your links may test fine in preview, the links are likely just linking to files on your specific drive on your specific computer. Here's a perfect example of a bad relative link to a folder called spiffy:
<a href="file:///C|/Documents and Settings/HP_Administrator/Desktop/spiffy/">
When it says file:///C| that means a place on your C: drive on your home computer. When you upload the files, the links are still looking JUST AT YOUR SPECIFIC DRIVE ON YOUR SPECIFIC COMPUTER. They are not looking for the files you just uploaded to the server computer. In other words, when someone else on their own computer (like, ahem, your instructor!) goes to use your Web pages, some or all of the links will be broken and your Web pages will look and/or act like junk. This is the biggest disaster possible when using Dreamweaver.
If you create links in Dreamweaver, within a site definition (green folders), you'll get good links. Here's a perfect example of a good relative link to a folder called spiffy:
<a href="spiffy/">
Use the EXPORT/ IMPORT feature within Dreamweaver. It works like this:
- Create the Site using the SITE Menu.
- Export the Site - this will allow you to save the .ste file to a location other than your computer's hard drive (such as your USB drive.)
- Import the Site - everytime you open Dreamweaver on a different computer, you can IMPORT the .ste file instead of creating a New Site from scratch.
Defining your Local Site
In Week 1, we discussed the concept of Local vs. Remote Sites. As a reminder, a local site is where your site is stored "locally" - or on your hard drive or USB drive. A remote site is where your site resides out on the Internet - typically a web server. The local site and the remote site should always mirror each other.
When you set up your site in Dreamweaver, you are only required to define the local site folder (you do not have to set up a Remote Server for every site). If you work in Dreamweaver frequently, you will get very skilled at setting up a local site because you will be doing it a lot! In fact, in our class, you will be setting up many local sites throughout the course of term - basically, everytime you start a new assignment, you will be creating a new local site.
Instructor Note:
For CAS111d, you will have MANY local sites set up within Dreamweaver.
Defining your Remote Site
In the "real world", you would most likely be working on multiple sites for multiple clients who all use different web servers. In that case, you would have a separate site definition set up for each client with both Local Site and Remote Site information stored in the Site Definition.
In our class, we are going to set things up a bit differently since ALL of your assignments for the entire term are going to one location - the SWS.
You will be setting up multiple LOCAL site definitions - but only one of them will have the REMOTE server information. This is the Class Site Definition and this is the one that you will use whenever you are ready to upload files to the SWS. You will be creating this in CAL3-2.
Instructor Note:
For CAS111d, you will have ONE remote site set up within Dreamweaver.
Creating the Site Definition (current Dreamweaver CS6)
- Choose Site and choose New Site...
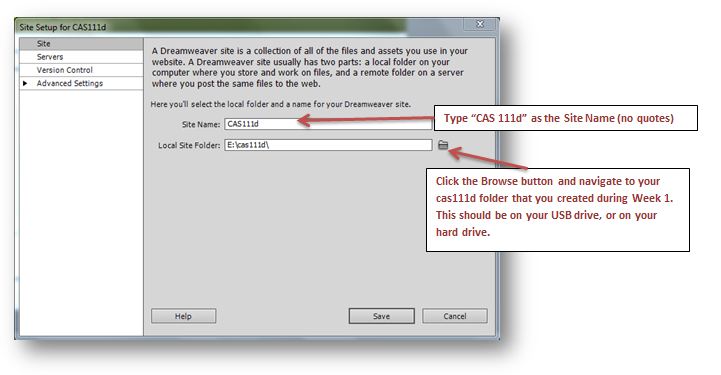
- Enter the following information for the Local Site Information:
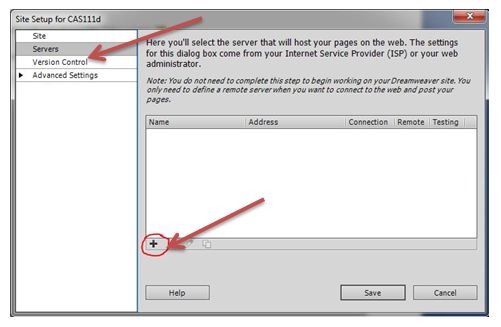
- Click the Servers option in the list on the left-side of your screen.
- Click the + button.
- Enter the information for the SWS as shown in the image below:
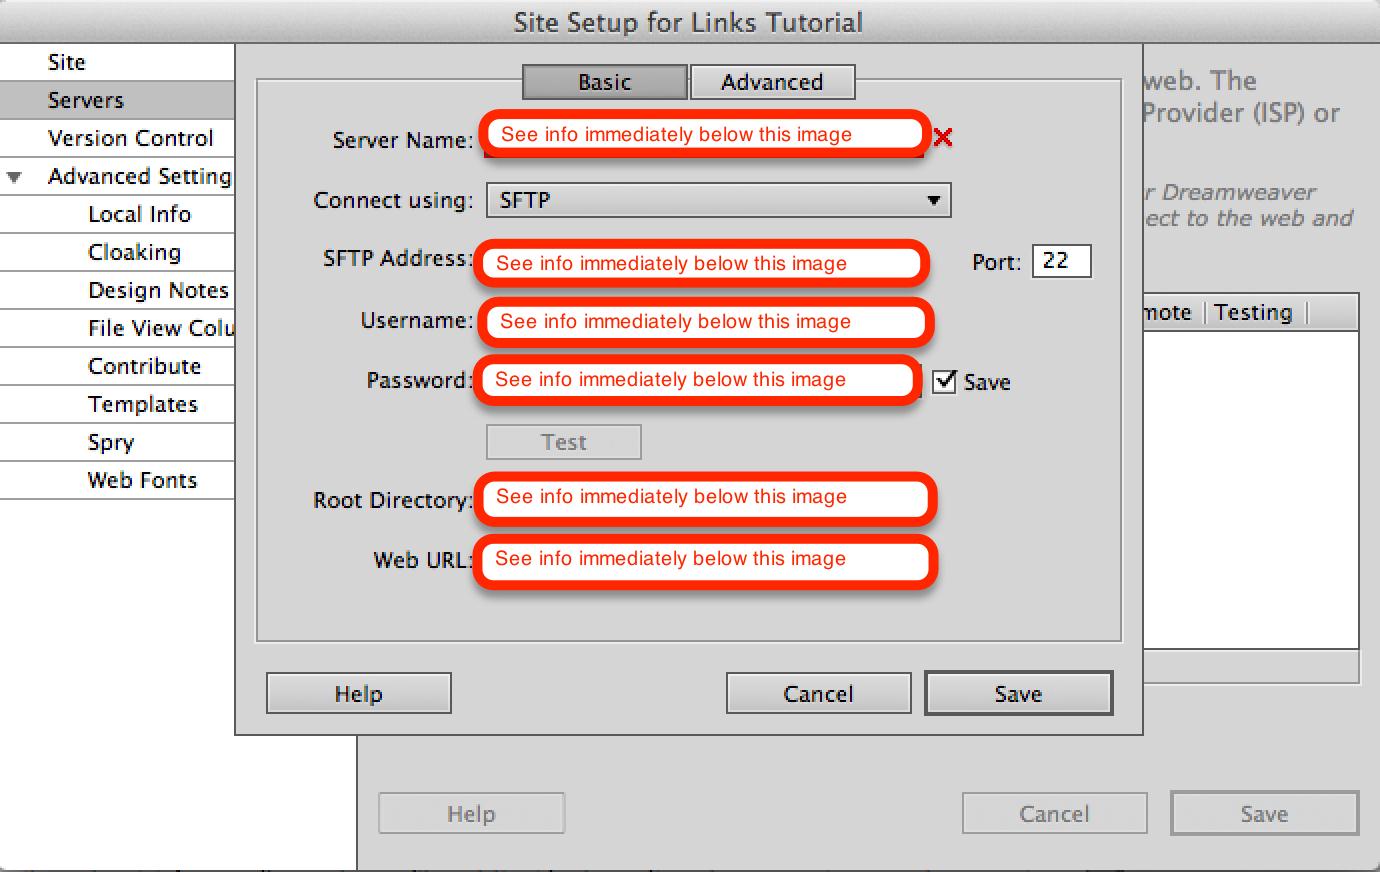
- Be sure to replace the information in the image above with your specific class and student information.
- The username is your specific SWS user name -- (Hopefully you remember it from week 1!)
- The Password is your complete G number (PCC ID number) beginning with a capital G
- The Root Directory should be the path to your directory on your SWS account. The best way to enter this long path is to use your browser to go to sws.pcc.edu and navigate to your directory in this class. Then copy and paste the path from the browser's address bar. The path should be something like: student/CAS111D_melany.budiman_20847/sallysmith99/
- Remember: your path will be different than this based on your course section and name.
- The Web URL is not required and you can ignore it.
- The case and slashes are very important so be precise.
- Click the Test button to verify your connection. If you entered everything correctly, you should see a message that says, “Dreamweaver Connected to your Web Server Successfully”
- Click the Save button.
- Click the Save button again.
If you always work on the same computer, you should only have to create the cas111d site ONE TIME! Every time you need to use it, simply select cas111d from the drop-down list in the Files Panel within Dreamweaver.
If you will be working on different computers or classroom computers for your assignments, you will not have access to the cas111d site definition on every computer. This is because the site definition information is stored on a computer's hard drive. Each time you need to access the cas111d site (when you need to upload your files), you will need to recreate the site following the instructions above. If you find this time consuming (it is!), you can also EXPORT the site definition which will allow you to put the site definition on your USB drive. Then when you sit down at a new computer, you can simply IMPORT the cas111d site and then it will show up in the Files Panel within Dreamweaver.
Back to the top of the page
Creating the Site Definition (Dreamweaver CS5 to CS5.5)
To set up a new Site Definition, follow these steps: https://sws.pcc.edu/help/ftp/cs5.html
- Click Site... from the Menu Bar
- Choose New Site...
- On the Site Tab (shown in the figure below), name your site after the class, and set the local folder to the folder you plan to use for the class.

In this example, the site, folder, and class all share the same name. This is a logical and easy way to keep everything organized. This Windows example also assumes the cas111d folder you will be working in is on an external drive, named E. Be sure to use the proper drive letter and path for your specific computer/drive. - Click the Servers... item (just below the gray site box in the upper left)
- You'll see a window that looks like this:
- Click the black plus sign (in the red circle in the figure above) to create a new Remote server.
- When the Basic server setup window comes up, fill in the fields as shown:
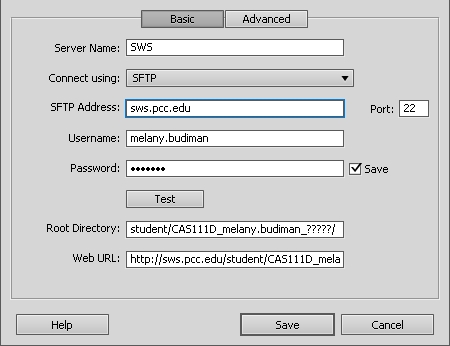
- In the first field where it says "Remote Server," put SWS if you are using the Student Web Server.
- Connect using: SFTP.
- FTP Address: sws.pcc.edu
- The username is your specific user name -- you can find it here.
- The Password is your complete G number (PCC ID number) beginning with a capital G
- Root directory: go to sws.pcc.edu, search for our class and click on the folder that has your name. Copy the URL from there and paste it in this box.
The ????? in the figure above represents the five-digit CRN for the course you are in.
Delete the beginning URL and put in the Root directory starting from: student/...
Instructor Note:
If you do not remove the path before /student, you will not be able to connect. - The Web URL is not required and you can ignore it.
- The case and slashes are very important so be precise.
- Click Save, then click Save again to get out of both windows. You have finished the process and you should notice that the folders in your Files panel are green (or greenish) instead of yellow.
One Site Definition Per Server
Always construct one Site Definition for one server.
Instructor Note:
Let me state that again: one Site Definition for one server.
You may have read in a textbook, online or heard from another instructor that you should create separate site definitions for each project or assignment. This makes sense for the purpose of learning how to set up a Site Definition, but it makes no sense for the purpose of being efficient and logical.
Nothing will create the potential for more file management chaos than creating multiple Site Definitions -- if you make one error regarding the Local Root Folder or Remote Folder, chaos will ensue. Instead, stick to the rule of one Site Defition per server and your life will be easier.
Since you'll be working with the Student Web Server, you should make just one Site Definition for all of your work in class for that server. In other words, have all your chapter folders, assignment folders, and test folders under one main folder for the class. I recommend calling the main folder cas111d. (Keep all your folder and file names lower case and use no spaces.)
- When you create the Site Definition, and it asks "Where on your computer do you want to store your files?" (also known as the Local Root Folder) you can browse to and select the cas111d folder on your computer or USB drive.
- When you are asked to supply the remote information, you can give the FTP address to the SWS or other appropriate server.
The folder on your computer or USB drive is equivalent to the folder you have defined on the server, so when you upload your files from your computer/USB drive, they will go to the proper server folder.
For example, in the case of this class, your folder on your computer or USB drive should be named cas111d. Your folder on the SWS is your username folder, which is always your name followed by a number, like janedoe18. In this example then, cas111d = janedoe18, which means they are at an equivalent folder level and any files or folders you upload that are stored under cas111d will automatically go under janedoe18 on the SWS and create an equivalent file/folder structure. That's good file management!
After you have completed a Site Definition, you will see the folders in the Files panel turn green -- GREEN IS GOOD. Those folders are all of the ones under your Site folder which, in this example, is cas111d. Always work inside green folders. If you are working in yellow folders, you are working outside the Site Definition and probably destroying your links. YELLOW IS BAD.
Cloaking, export and import your Site Definition
Cloaking the site definition:
Site cloaking enables you to exclude files and folders from operations such as Get or Put or Synchronizing. You can also cloak all files of a particular type (fla, psd, ste, and so on) from site operations.
- Choose Site and choose Manage Sites...
- Double-click on the cas111d site to open
- Click the Advanced Settings option on the left-side and choose Cloaking
- Check the box next to Enable Cloaking and Cloak files ending with: fields
- Put your cursor at the end of .psd, press the spacebar on your keyboard and type ".ste" (no quotes)
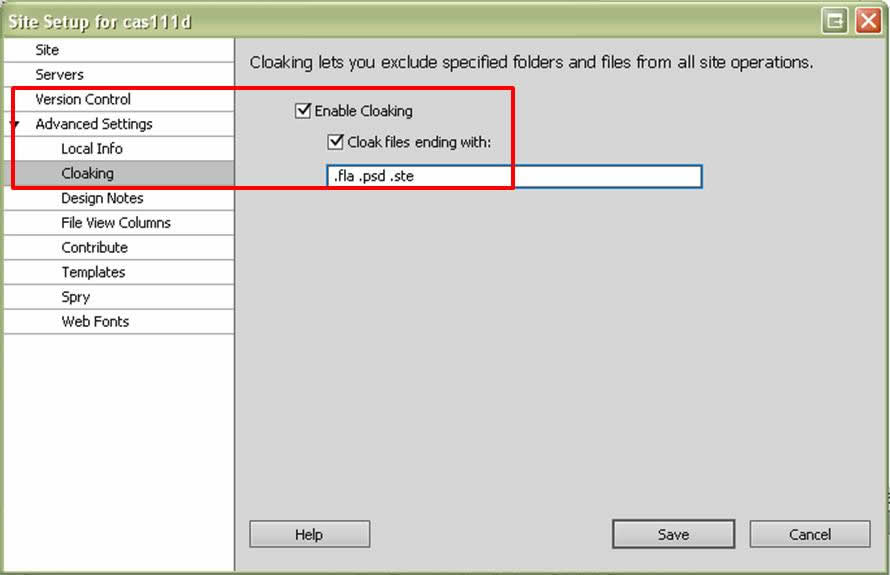
- Click the Save button
- Click the Done button to close the Manage Sites window.
To Export the site definition:
- Choose Site and choose Manage Sites...
- Select the cas111d site.
- Click the Currently selected site(s) icon.
- Select a location for the site definition file (preferably your USB drive).
To Import the site definition for use on a different computer:
- Choose Site and choose Manage Sites...
- Click the Import Site button.
- Locate the .ste file that you exported and click the Open button.
- Click the Done button to close the Manage Sites window.
- The cas111d site should show up in the Files Panel within Dreamweaver.
Uploading Files and Folders to the SWS using Dreamweaver
Beginning with Week 3, you will be using the Site Management feature within Dreamweaver to upload your files and folders to the SWS. Each assignment contains instruction
- In the Files Panel in Dreamweaver, select the cas111d site from the site dropdown list. If you can't find it, you either need to recreate the cas111d site (see above), or import the site if you had previously exported it (see above).
- Click on the name of the folder you want to upload.
- Click the Put file(s) to "Remote Server" icon
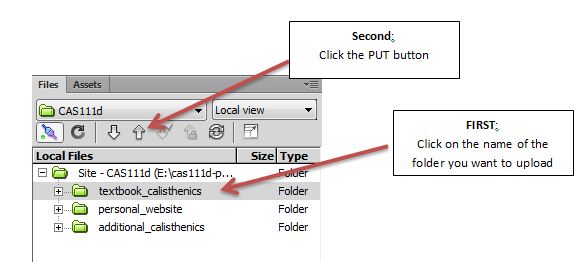
- If you see a dialog box with a confirmation about Dependent Files, go ahead and click the Yes button.
- Verify that your files were uploaded successfully. Using your browser, go to sws.pcc.edu and locate your directory. Make sure the files appear correctly with all images and links working.
Uploading Files and Folders to the SWS using Filezilla
Filezilla is an FTP program that allows you to transfer files and folders from one location to another. For our class, you will be transferring files from your USB or Hard drive to the SWS. You can also use Filezilla to perform File Management tasks, such as renaming, deleting, moving, etc.
You will be using Filezilla for Modules 1 and 2. Beginning with Module 3, you will be using Dreamweaver to upload files.
PCC provides support for Filezilla. Refer to their support page if you need help using Filezilla.
Problems Uploading with the Site Definition
The most likely cause of problems uploading are typographical errors in the path, username, and/or passwords. Double, triple, or quadruple check these. You can also export the Site Definition (see Backup above) and send that .ste file to the instructor for a second opinion.
In some rare cases, most notably on Macintosh computers, students have commented that they are unable to upload files and there are no other errors with their Site Definitions. The most likely reason is that their Mac firewalls (part of the Mac OS) are blocking the connection. To fix this problem,
- Click on Site...
- Click Manage Sites...
- Choose the Site Definition, the click Edit...
- Click on Servers... item (top left)
- Click the Remote Server item in the table on the right
- Click the pencil tool to edit that Remote Server
- You'll see the Basic server window (as shown in Step 7 of Creating the Site Definition above)
- Click the blue arrow in front of More Options to open that collapsed panel. It should look like this image:

- Make sure you connect using SFTP (Secure FTP) with port 22. Screenshot is not accurate since PCC changed the server to a secure server starting Summer 2012.
- The solution to most firewall problems is fixed by choosing Use Passive FTP (top item circled red in figure above). Check that option, save and try to upload again.
- If Use Passive FTP doesn't work, uncheck the Use FTP performance optimization (bottom item circled red in figure above). Save then try to upload again.
- Try a different combination of these two if you have no success. The correct combination of these will solve 99% of uploading problems related to firewalls.