Rollovers
If you see a picture gallery on someone's website, it can only be created 2 ways: using flash or javascript. If it's using flash, when you right-click on the picture gallery, it will said something about flash player (swf) file.
- Part 1 - Planning and Preparation
- Part 2 - Adding Content and JavaScript
- Part 3 - Rollover Summary
- Part 4 - Save and Upload
In this exercise, you will create a simple rollover, which is using Javascript Behaviors to perform the rollovers.
Part 1: Planning and Preparation
- Create folder called examples, if do not have it already. Then create a sub-folder inside it called assets. The assets folder will contain all the pictures used in this exercise.
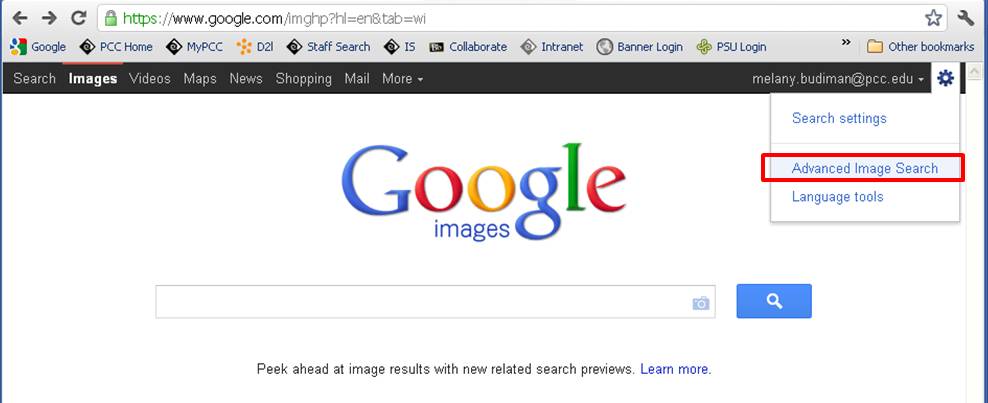
- Open your browser, IE or Firefox. Go to Google Images search, click on the gear button at the top-right corner and select "Advanced Image Search" as shown in the image below.

- Search for 2 completely different images we will use for this exercise:
- Search for "desert" or "mountain" or "beach" image. Do it one at a time.
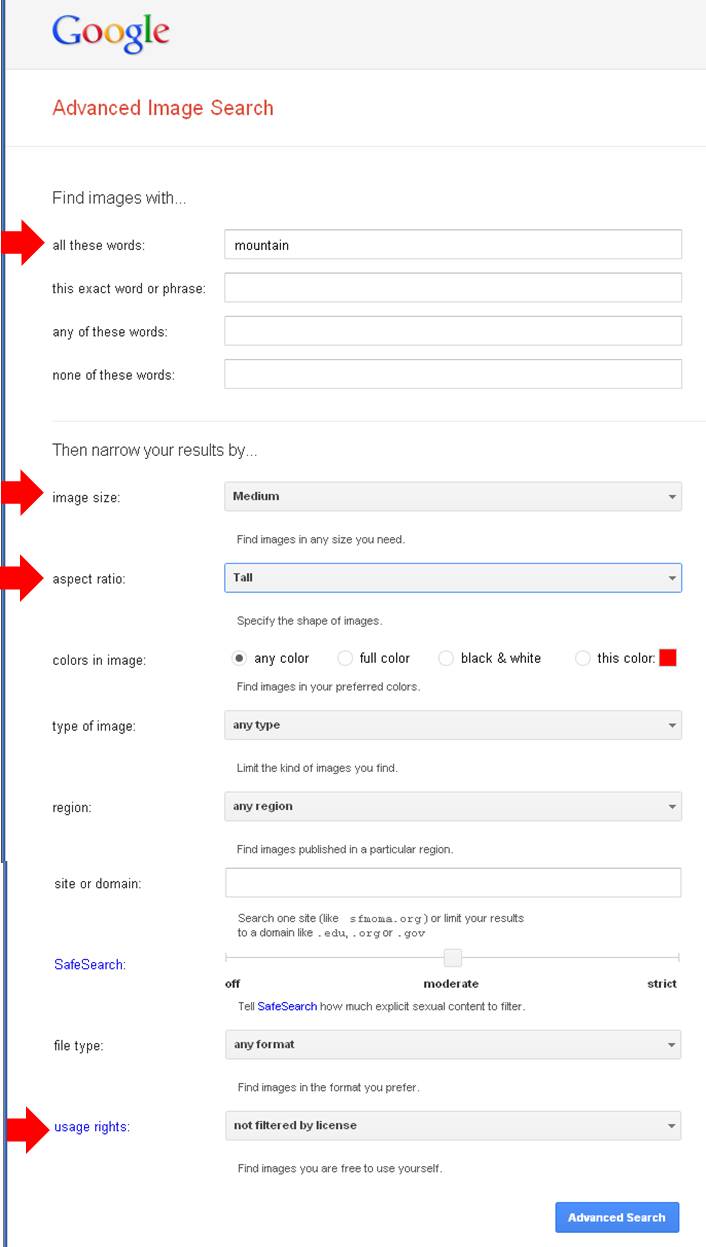
- Set the filter to find "medium" image size, somewhere about 400 to 500 px wide.
- Set the filter to find 1 image with a "tall" aspect ratio and another one of "wide".
- You can set the usage rights to "not filtered by license". It should be ok to use sice we only use it for an exercise and not going to sell or modify it. However, you need to be careful and understand about using copyrighted images for your student work or projects. If you think you are going to publish your web page publicly, make sure to set the usage rights to "free to use, share or modify, even commercially" or you can also try to find a royalty free images or buy images.
- Click the Advanced Search button to start searching for the image.
Below is what the search filter looks like:

- Save those two files inside the examples/assets folder.
- Create a new file called rollover.html and save it in the examples folder.
- Create a page title with the text "Rollover Example" (no quotes).
- Save the rollover.html file.
Part 2: Add Content and javascript
Add text and images into the page.
- Create a heading 1 with the text "Rollover Image" (no quotes).
- Create a paragraph under the h1 with the text "Here is my cool rollover image" (no quotes).
- Below the paragraph, insert the first image with the tall aspect ratio from the assets folder. Don't forget to add the appropriate alternative tag.
- Click to select the image and give it an ID. You can do it from the code view (i.e. <img id="desert" /> ) or from the Properties panel.
Instructor Note:
To target anything with Javascript, we must give the element an ID. ID needs to be a one word, lower case, no space, no weird character, and easy to remember. You may use an underscore (_), but not hyphen (-).
- Activate the Behaviors panel (Window --> Behaviors) and click on "Behavior".
- Click to select the image, if you have not already done it, and click on the + (plus sign) on the Behaviors panel to select Swap Image.
- Click the Browse button to navigate to examples/assets folder and select the other image with the wide aspect ratio.
- Leave the checkboxes for both "Preload images" and "Restore images onMouseOut"
Instructor Note:
Preload Images means when the page is loading, it will also load the images on that page, including the swap image(s), so that there won't be any delay when your user hover the mouse over the image.
Restore images onMouseOut means the image after swap to another image when the mouse is over it, it will return to the original image when the mouse is not over it anymore. If you uncheck this option, the swap image will stay on the second image, unless you refresh the browser.
- Click the OK button.
- Save the file.
Activity:
- Go to Code view and see what you just did? What do you think of the Javascript?
- Preview the file in the browser. Do you see any problem with it?
- Try to remove the width and height of the image from the Properties panel. Save the file and preview it again in the browser. What do you think compare to the one you saw previously?
Part 3: summary for doing rollover
Here are the steps you need to do to create rollover images:
- Images need to be the same size.
- Insert image into the page (alt tag).
- ID the image (lowercase, no space).
- Open Behavior panel from Window menu, inside Tag Inspector.
- Click on the + sign
- Choose Swap Image
- Browse to select the new second image.
- Usually leave the checkboxes for preload image and onMouseOut.
Part 4: Saving and Uploading
- Save your rollover.html Web page.
- Upload examples folder to the SWS.
Instructor Note:
As you should be in the habit of doing, be sure to use a browser (or more than one browser) to check your Web pages on the SWS to ensure everything works properly.