Forms
Forms are an important element in web design because they provide a way to interact with the visitors to your site. A form is a means of collecting information from users. Forms encourage user interaction because they enable the user to enter and send information over the Web without leaving the website. The user inputs information into the form by typing requested data into designed fields or clicking check boxes, option buttons, lists, and so forth to make selections. After the form is filled out, the user submits the form, which sends the information somewhere, usually to the server, for processing. Several steps must occur for a form to work:
- The designer creates a form on a web page.
- The designer installs a script or application in the designed information-processing destination, which is usually the web server, to process the form information.
- The site visitor fills out the form and submits the information.
- The server receives the information and a server-side script or application processes the information.
- The server sends the requested information back to the user or performs an action based on the form's information.
You can create a form on any Web page. But before you create the form, you should plan what information you want to collect, how the form should be designed to best collect that information, and where you want to place the form on your website. The general process for creating a form is to add a form to a Web page, set the form attributes, and then add form objects. Dreamweaver makes this process very easy.
Web forms has many different fields. The most common kinds were
| Field Type | HTML Code | Notes |
|---|---|---|
| checkbox | <input type="checkbox"> | can be toggled on or off |
| radio button | <input type="radio"> | can be grouped with other inputs |
| password field | <input type="password"> | echos dots instead of characters as you type |
| drop-down lists | <select><option>…</option></select> | |
| file picker | <input type="file"> | pops up an “open file” dialog |
| submit button | <input type="submit"> | |
| plain text | <input type="text"> | the type attribute can be omitted |
| text area | <textarea>...</textarea> |
Validating Forms
You can create the most beautiful form for your website, but you can't completely control what the site visitor is going to enter into the form fields. However, you can set up your form fields to validate before the form is submitted. This means that you set up rules or restrictions on the form fields that require the information to be entered in a specific way. Here are a couple examples of how you might use form validation:
- Make a field on the form required - the form will not submit if the field is left blank.
- Require a specific format for the information that is entered into the field - such as an email address. If the user enters the information in the wrong format, the form will not be submitted.
Dreamweaver CS6 has a set of tools called Spry Validation Widgets that you can customize for your form. Unfortunately, Spry widgets are replaced with jQuery widgets in Dreamweaver CC and later. While you can still modify existing spry widgets on your page, you cannot add new spry widgets.
Here are some examples of HTML5 forms feature: automatic input validation without using any script.
| Field Type | HTML Code | Validation |
|---|---|---|
| <input type="email"> | This will validate the information an email address. For example, virtually all email addresses contain the @ sign and at least one period (.), but they’re unlikely to contain any spaces. It will also automatically put the @ inside the email client. So when you use an iPhone and focus an <input type="email"> element, you get an on-screen keyboard that contains a smaller-than-usual space bar, plus dedicated keys for the @ and . characters. "Please enter a valid email address." |
|
| url | <input type="url"> | This will validate a web address. If someone asks you to enter a web address into a form, they’re expecting something like “http://www.google.com/”, not “123 Faraway Road.” Forward slashes are common — even Google’s home page has three of them. Periods are also common, but spaces are forbidden. And every web address has a domain suffix like “.com” or “.org”. The iPhone altered its virtual keyboard, just like it did for email addresses, but now optimized for web addresses instead. The space bar has been completely replaced with three virtual keys: a period, a forward slash, and a “.com” button. (You can long-press the “.com” button to choose other common suffixes like “.org” or “.net”.) "Please enter a URL." |
| number as spinboxes | <input type="number" min="0" max="10" step="2" value="6"> |
The validation of numbers even takes into account the min and max attributes, so browsers will not let you submit the form if you enter a number that is too large.
"Please enter a number less than or equal to ..." Attributes are optional:
|
| number as sliders | <input type="range" min="0" max="10" step="2" value="6"> | You can now have slider controls in your web forms, too. Safari, Chrome, Opera, Internet Explorer 10, and the iPhone running iOS 5 render type="range" as a slider control. (Sadly, the iPhone running older versions of iOS renders it as a simple text box. It doesn’t even optimize its on-screen keyboard for numeric input.) All other browsers simply treat the field as type="text", so there’s no reason you can’t start using it immediately. Attributes are optional and the same information as <input type="number">
|
| search | <input type="search"> | This will make the input box to have rounded corners! Only works in Chrome and Safari (Mac OS). Safari and Chrome also inserts a small “x” button on the right side of the box. Clicking the “x” clears the contents of the field. |
| required | <input required> | You can specify that certain fields are required. Required fields must have a value before you can submit the form. "Please fill out this field." |
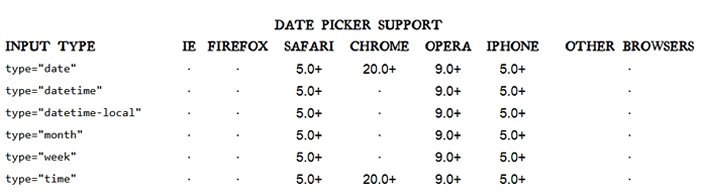
| date picker | <input type="date"> | HTML5 finally defines a way to include a native date picker control without having to script it yourself. In fact, it defines six: date, month, week, time, date + time, and date + time - timezone. So far, support is… sparse. Only supported in Safari, Chrome, Opera, and iPhone. This form field will be rendered as plain text box in browsers that don’t recognize type="date" and the other variants. If you like, you can simply use <input type="date"> and friends, make Opera and iOS users happy, and wait for other browsers to catch up. Or have a fall back to a scripted solution of your choice (Dojo, jQuery UI, YUI, Closure Library, or some other solution).
|
There is no markup required to activate HTML5 form validation; it is on by default. To turn it off, use the novalidate attribute.
<form novalidate>
</form>
Resources
Here are sample websites where you can find out more about forms:
- 8 Killer Web Form Builders for Your Site.
- Web Form Validation: Best Practices and Tutorials.
- Create forms in HTML5.
- Creating an HTML5 Form Using the New Form Types.
Tasks:
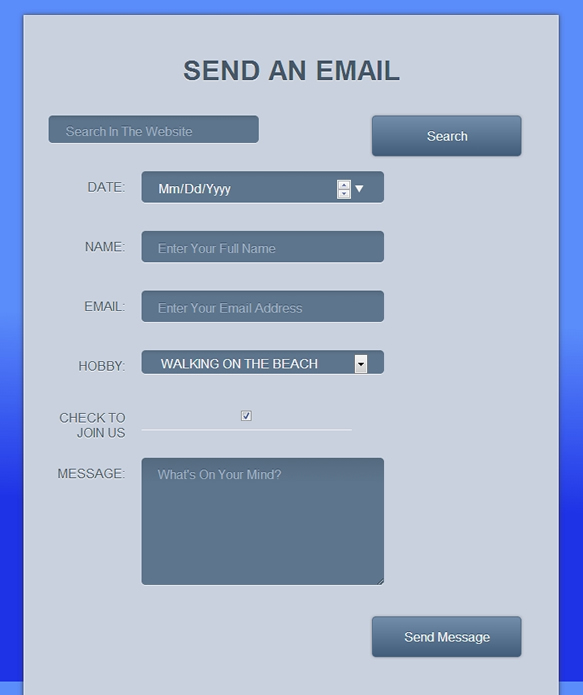
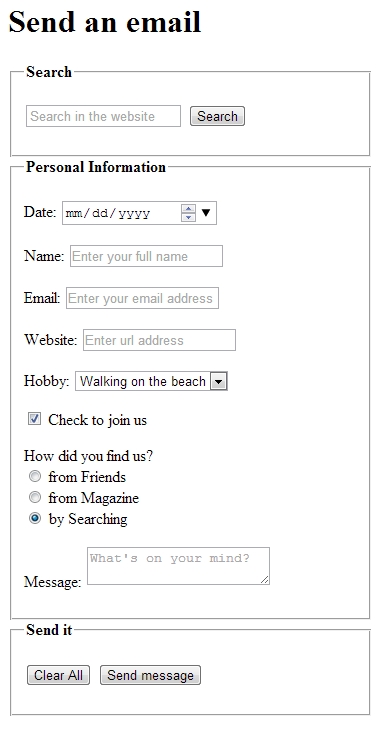
Here is what the roughly finished Contact Us page should appear.
Part 1 -- Preparation
- Create a folder called examples ( if you haven't already) on your computer and under your cas111d folder.
- Create and save a blank Web page as contact-form.html into the examples folder on your computer.
Part 2 -- Content
Your page should look like the sample (above).
- Enter a page title with the text "Contact Us" (no quotes).
- Create a div id="contact" because we will put everything inside this div box.
- Inside the div="contact", create a heading 1 with the text "Send an email" (no quotes).
- Let's add our Insert Forms panel in DW so it's easier to add our form components. Click on the Window menu and select Insert (make sure the Insert has a check mark next to it). In the Insert panel, change the Common menu to Forms.
- In Design view, create a form by clicking on the Form from the Insert Form panel.
- In the form properties panel, add the id with the name "contactform" (no quotes).
Instructor Note:
Because we don't have a server-side script to process our form, we just put "#" as a value in the action attribute. An example of a valid form would look like this:
<form id="contactForm" action="http://www.pcc.edu/mailform/mailform.cfm" method="post"> </form>.
method="post" is used to send information securely. Any information entered in the fields will not be stored in the browser temporary files.
method="get" is used by search engine, such as Google. It will allow the information entered in the fields to be stored in the browser temporary files and the page can be transfer faster to the user when they access the website from the search results. - Add the <fieldset> tags, followed by the <legend> tags. Fieldset organizes items in forms logically, to group form inputs, but it also improves the accessibility for those who use aural browsers. Enter "Search" (no quotes) inside the <legend> tags and make it bold.
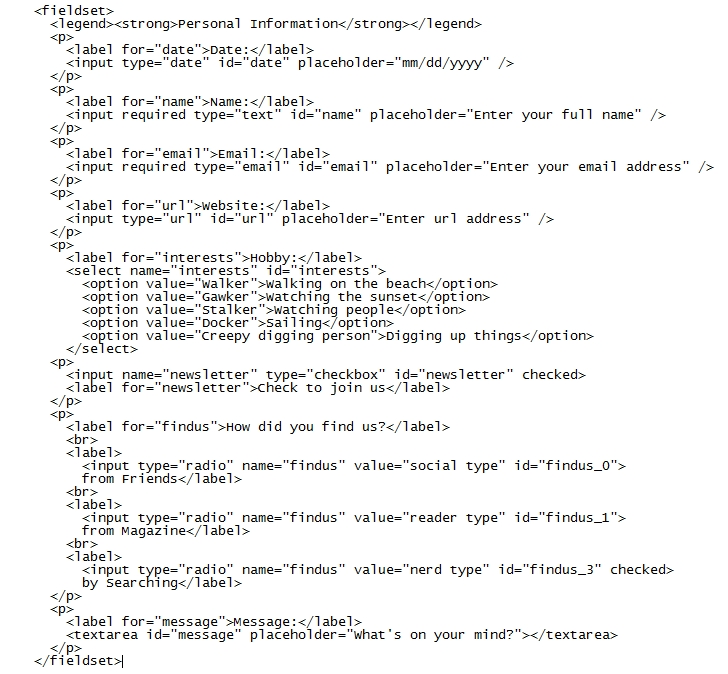
- Add the rest of the fields as shown in the picture below:

Instructor Note:
The autofocus attribute does exactly what it says: as soon as the page loads, it moves the input focus to a particular input field. But because it’s just markup instead of script, the behavior will be consistent across all web sites. Also, browser vendors (or extension authors) can offer users a way to disable the autofocusing behavior. Browsers that don’t support the autofocus attribute will simply ignore it.
Attribute type="search" will make the input box to have rounded corners! Only works in Chrome and Safari (Mac OS). Safari and Chrome also inserts a small “x” button on the right side of the box. Clicking the “x” clears the contents of the field. - Add the <fieldset> tags, followed by the <legend> tags. Enter "Personal Information" (no quotes) inside the <legend> tags and make it bold.
- Add the rest of the fields as shown in the picture below:
Instructor Note:
<input type="date"> only works in selective browsers. You probably will need to have a fall back plan and use a scripted solution of your choice (Dojo, jQuery UI, YUI, Closure Library, or some other solution).
Attribute required will force the user to fill out the field before submitting the form. If the user skip the field, it will prompt them with the message "Please fill out this field!"
Attribute placeholder will put the text in the field to guide the user what kind of information or format should be there.
<input type="email"> will automatically validate the information as a valid email address. For example, virtually all email addresses contain the @ sign and at least one period (.), but they’re unlikely to contain any spaces. If the user doesn't enter the correct valid email address, it will prompt them with the message "Please enter a valid email address"
<option value="..."></option> You can enter any information you want for the value inside the value attribute because the user will not be able to see this value. The value is usually contain important information for the form owner to identify which option the user picked. For example: if inside an order form, the value inside the value attribute can be set to be the product id.
Attribute checked will set the option turn on by default. If the user forgets to choose the option, the default value will be set as their preference. - Add the <fieldset> tags, followed by the <legend> tags. Enter "Send it" (no quotes) inside the <legend> tags and make it bold.
- Add the rest of the fields as shown in the picture below:

- Let's organized your source code by clicking on the Format Source Code button and you'll get a menu of options.
- Choose Apply Source Formatting (the first option). You can now see it as typical, well-formatted and readable HTML source code.
- Save the page.
- Here's what your page should look like now (preview in Chrome browser):
Part 3 -- Styling
You can create your own style for the form.
For fun, you can add css3 gradient generator (text shadow, box shadow, border radius, and gradient) using this website.
Part 4 -- Finishing Steps
- Save and upload the file to the SWS.
- View the Web page through a Chrome browser on the SWS. This is a non-graded assignment because it is part of the form's lecture in class.
Instructor Note:
As you should be in the habit of doing, be sure to use a browser (or more than one browser) to check your Web pages on the SWS to ensure everything works properly.