Dreamweaver Efficiency Tools
Dreamweaver has many efficiency tools that help you work quickly with websites both small and large.
Among these are:
- Format Source Code
- Spell Check
- Quick Tag Editor
- Find and Replace
- Resample Images
Each of these will be examined below in the context of working with a previously created site, the fictional Tangled Salamanders website.
Dreamweaver versus Other HTML Editors
There are many different HTML Editors and more programming-oriented Integrated Development Environments (IDE's) that allow you to quickly create HTML, CSS, JavaScript and other Web-related codes and scripts. Considering the cost of Dreamweaver, which is still the most expensive program in its class, it may be worth checking out a less expensive option if you don't require all the features Dreamweaver provides. This Wikipedia article: Comparison of HTML Editors provides tables comparing prices and major features of these editors.
Also, useful to consider, are the efficiency features of these other editors. Before you invest in an HTML editor, you may want to ensure that it can
- spell check your text content
- automatically format your HTML code into a more readable, industry standard arrangement
- find and replace code or content throughout your website
You'll find that, at least with Dreamweaver, the efficiency features listed above are included, and, by themselves, can save you a great deal of time, making Dreamweaver a more reasonable monetary investment.
This calisthenics shows you how to work with some efficiency tools in Dreamweaver to speed up your workflow on a website.
Part 1 -- Preparation
- In the Course Files, go to the cal4-site folder and download the tangled-site.zip file (if you haven't already).
- Create a cal4 folder under your calisthenics folder (if you haven't already).
- Decompress tangled-site.zip into your cal4 folder. The Web page (.html files) should be directly in cal4, and the assets can be copied over from the zip file to the cal4 folder to become a sub-folder there. There are a total of 5 Web pages, 1 CSS file, and 41 image files.
- Open up Dreamweaver and be sure you are working in a site definition (green folders) in the Files panel.
Part 2 -- Format Source Code
HTML code, as with all other code whether it be programming languages, scripts, or stylesheets, should be "formatted" in a way that makes it more organized and easier to read. Readability is the key here.
The industry-standard approach to formatting HTML code is followed by Dreamweaver and is best demonstrated by looking at a Web page designed in Dreamweaver. This is Code view of well-formatted HTML source code (this is an excerpt of the code created in the On Your Own 4 assignment, index.html page):
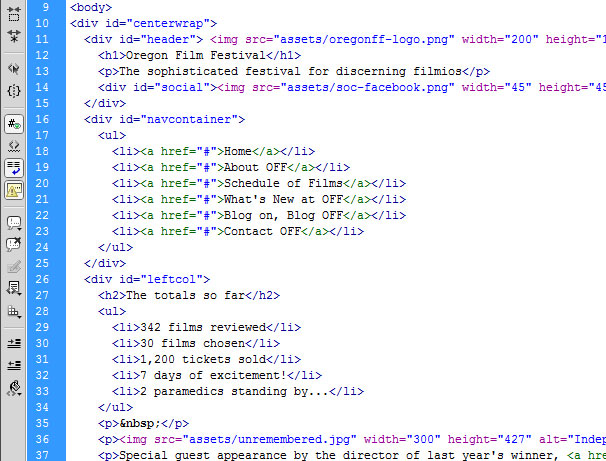
Notice some of the features of well-formatted HTML code:
- Most individual opening tags start on separate lines from each other.
- The major container (the div that holds all the others) is not indented (see line 10).
- Any element (tag) contained directly within div#centerwrap is indented 2 spaces from the left. This includes div#header (line 11), div#navcontainer (line 16) and div#leftcol (line 26).
- Any element that is inside another element (also referred to as being "nested in") is indented two spaces. Since div#social (line 14) is inside div#header, it is indented 2 spaces left from that div.
- Also, notice that all li tags, which are always nested in ul or ol tags, are indented 2 spaces left from those.
Look at the ul on line 28. By looking at this code, you can quickly see that it is nested in div#leftcol.
Look at the p tag on line 13. Again, it's easy to see that it's inside div#header because of the amount it's indented.
This indenting is key to making code more readable and easy to understand.
Now, let's look at poorly formatted HTML code.
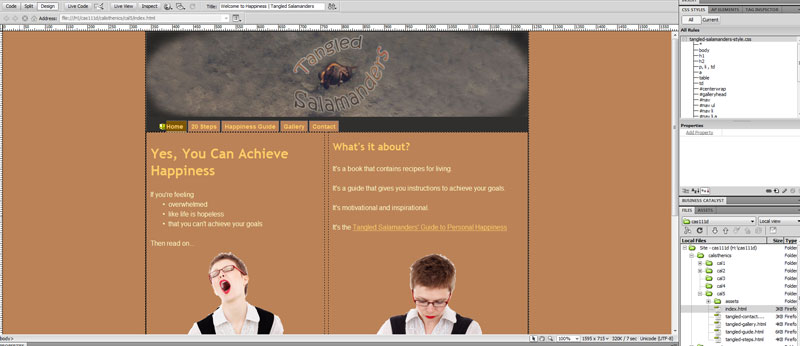
- Open up the home page (index.html) of the Tangled Salamanders site (from tangled-sites.zip) that you copied into cal4. View it first in Design view, and it appears like a normal Web page:
- Now switch to Code view and see what it looks like:
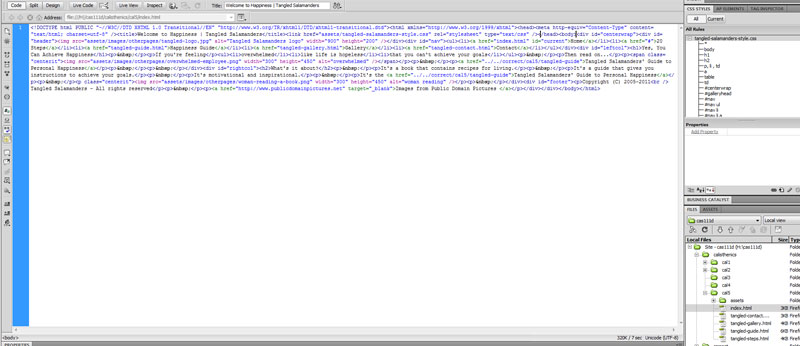
- Wowza! All the HTML code is piled together ON ONE LINE. Notice that it doesn't affect the functionality of the page, but it's not at all readable.
Instructor Note:
As an aspiring Web designer, you'll run across this now and again. The designer who does something like this thinks they are being clever and attempting to disguise some of their ingenious coding tricks. They aren't. They are just being stupid. Fortunately, if you pull the code into Dreamweaver, you can fix this -- read on... - Notice the Coding toolbar on the left side of the screen (as shown in the image below). At the bottom of this toolbar is the Format Source Code button (it looks like a paint bucket).
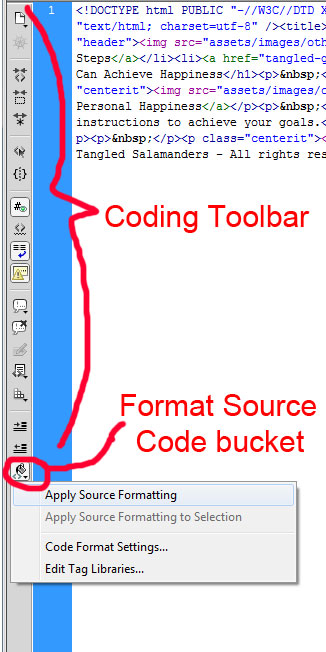
- Click on the Format Source Code button and you'll get a menu of options.
- Choose Apply Source Formatting (the first option).
- Just like that, the problem is fixed and you can now see it as typical, well-formatted and readable HTML source code.
- Save that page and close it. All the other pages of the site have properly formatted HTML code.
Part 3 -- Spell Check
- Open the tangled-steps.html file from the cal4 folder.
- While in Dreamweaver Design view, notice the list in the right column. There are several spelling errors, some obvious, but others are subtle.
- Click on Commands on the main menu bar of Dreamweaver.
- Choose Check Spelling from that Commands menu.
- It's best to Change the errors one at a time, ensuring that the choice you are making is correct. Notice with this one, the choice isn't correct, and if you had chosen "Change All" it would have made an incorrect substitution:

- You'll also want to ignore the suggestion to fix "co-workers" since that is a legitimate spelling of the word.
- Lastly, be sure you spell-check the entire page if it asks you.
- Save this page. All the other pages of the site have proper spelling.
Part 4 -- Quick Tag Editor
- Open the tangled-steps.html page if it isn't already. (It's the same one you did the spell check on in Part 3.)
- In Dreamweaver Design view, notice that the 20 Steps listed in the right column don't have continuous number order from 1 to 20 -- they appear to be 4 numbered lists instead which is an error and looks awkward.
- Notice also that every time there is a picture inserted, it breaks the progression, and they start numbering over. This is because the image tag is not placed within the ordered list (numbered list), so the ordered list must end, then the image is inserted, then a new ordered list is begun. Of course, the image tag can't be placed there for styling purposes (it's centering in the column) so the steps have to be broken into 4 parts, or 4 ordered lists.
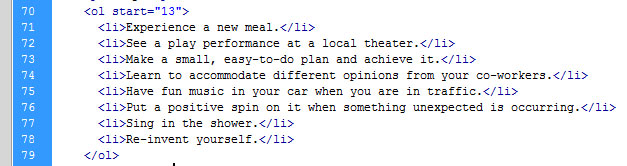
- To fix this problem and make the list number from 1 to 20, you can add a start attribute to the 2nd, 3rd and 4th ordered lists in div#rightcol.
- You can add this start attribute directly into the code in Code view, however there is a faster way to do this by using the Quick Tag Editor.
- To use the Quick Tag Editor, you must first select the tag on the status bar you want to edit:
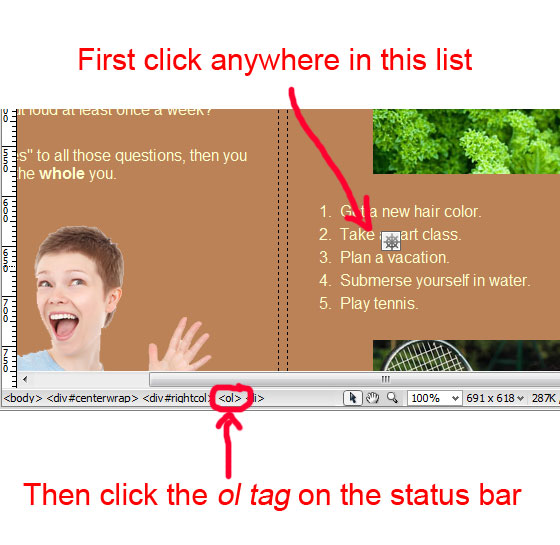
- As shown in the image above, first click anywhere in the 2nd ordered list (the one under the green vegetable picture).
- Then click the ol tag on the status bar. That will select the entire 2nd ordered list (and only that ordered list).
- Then right click on the ol tag on the status bar (the same one you just left clicked on to select that list), and choose Quick Tag Editor from the pop-up menu.
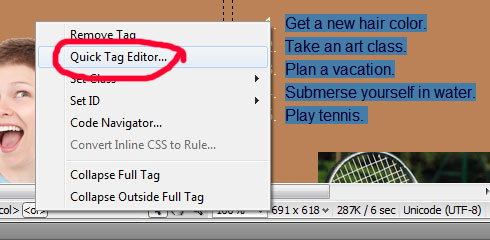
- You'll be able to edit the tag right from Design view without switching over to Code view.
- With the insertion point already in the opening tag of that ordered list, type a space (space bar) -- attributes always follow the opening tag name with a space, but still within the brackets.
- Begin typing the first 2 letters of the word "start" -- just the "s" and the "t". Notice that another pop-up menu appears as you type:
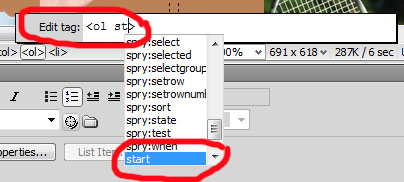
- Notice also that the word "start" is the attribute that comes up once you type the first two letters of its name.
- Press Enter (Return) to select it.
- Now notice that it provides that attribute name AND the equal sign AND the quotes for the value automatically so you don't have to type them.
- Then type the value "5" in the quotes.
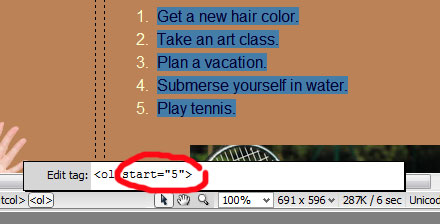
- Then press Enter (Return).
- Notice that the ordered list updates to 5 through 9.
- Repeat the steps above for the 3rd (start="10") and 4th (start="13") ordered lists.
- It may seem like a lot of steps above, but in reality, it's meant to go quickly. For the 3rd ordered list, here is the key/mouse combo:
Click in the list -> Right Click on the ol tag -> click Quick Tag Editor -> type space then "st" -> press Enter -> type 10 -> press Enter
In other words, click, click, click, type, Enter, type, Enter.
Instructor Note:
If you get the hang of this, it's about twice (or more) as fast as typing attributes directly in the code, in part because it's faster to find the content containing tag in Design view than it is in Code view. Of course, that's for content tags like p tags, ol and ul tags, img tags, etc. For divs and sectioning tags, if you can't see them in Design view, then it's probably faster to do those directly in the code. - If you switch to Code view, here's how the 4th ol appears there with the start attribute:
- Save the tangled-steps.html file and close it.
Part 5 -- Find and Replace...
Find and Replace in Dreamweaver is powerful. It allows you to Find and Replace
- Text content on one page (the open document) or
- Text content on all open pages (tabs that are open in Dreamweaver) or
- Text content on all documents, even closed ones, in one folder on your site -- this means it automatically and behind the scenes opens, updates, saves, and closes the closed documents (and very quickly, too!), so this is not something you can Undo -- or
- Text content on all documents in your entire site (all green folders in your site definition). This is amazingly fast, too, and it takes only a few minutes on hundreds of Web pages or
- Source code on all documents as described with text content above -- in other words, you can swap one tag out for another, like change all your h2 tags to h3 tags -- or even whole sections of tags, like everything within the head tag with another group of tags that go there from a different page, or
- Only text content within certain tags -- like only the word "copyright" if it exists in p tags, but not if it exists in li tags.
In this Part, we'll do a few of these options above.
Find and Replace... text content in one folder
A common annual activity is updating your copyright year across all pages of your entire site.
- No files need to be open currently. You should just have your site definition loaded -- green folders in the Files panel are the indication that you are ready to use Find and Replace...
- Click Edit from the main menu bar, then Find and Replace...
- From the Find and Replace... dialogue box, choose Folder... (from Find in:)
- Using the browse (folder) button that appears, select the cal4 folder. If you don't select that one, it may do the entire site, which would just make it slower than it should be.
- Choose Text (from Search:)
- In the Find box, type 2005-2011 (which is the copyright years included in the Tangled Salamanders site).
- In the Replace box, type in 2005-xxxx (where xxxx is the current year).
The picture below shows an example of this done in 2012: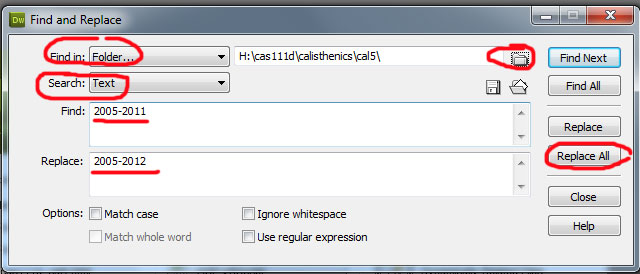
- Click Replace All and you'll be warned that you can't Undo this operation (because it opens, updates, saves and closes all affected files as it goes). Confirm that no Undo is Ok by clicking Yes.
- Very quickly, it will make the changes. If you didn't type something correctly in Find or if you chose the wrong folder, it will tell you nothing has been found. Try again. If you just realized, after the fact, that you typed in the wrong value in Replace, then you'll be doing this once again, replacing the erroneous previous replacement (now in Find) with a new, correct Replace value.
Instructor Note:
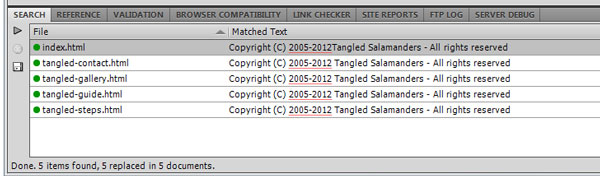
When you're replacing text, it's better to use more text in Find, than less text. In this example, notice we used "2005-2011" instead of just "2011". This is because the year range "2005-2011" definitely was in the copyright area of the footer and only there. "2011" may have been in another location in our pages, like a publishing date for a book, or a release date, or a past schedule date for something else -- these are not necessarily occurrences of that year that you'd want to change. It's too inspecific, which is the problem. Be more specific, and you'll likely be correct on Find and Replace... - You should also see a Search panel appear under the Properties panel confirming the replacements (there should be five, one in each of the Tangled pages):
- If it looks good, no need to save, just move to the next steps.
- You may want to close the Search panel. To do this (with any panel, by the way), double-click it's name on the tab. To open it, double-click it again.
Find and Replace... source code text with character code
You may have noticed (in the Search panel image above), that the copyright "c" isn't using a copyright symbol (looks like this © and in the code is ©), but instead Tangled is using a (C). We can fix this with Find and Replace..., too.
- Click Edit on the main menu bar, and choose Find and Replace...
- The cal4 folder should already be chosen, but if not, be sure to choose Find in: Folder... and pick that folder with the folder browse button.
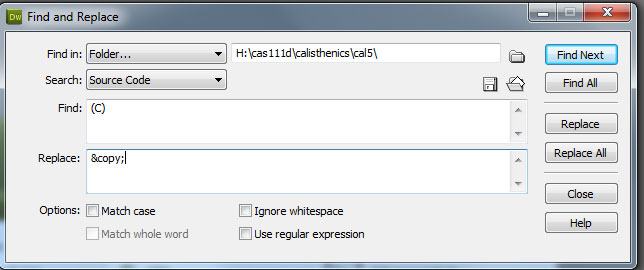
- This time, instead of Text, choose Source Code in Search: -- we need to add the copyright symbol and that can only be done in the code.
- In Find: type (C)
- In Replace: type © (do NOT forget the semi-colon on the end of that character code).
- This should look very much like your Find and Replace window...
- Click Replace All and confirm that it's Ok to not have Undo capability.
- And you're off -- very quickly. You should see the Search panel appear with 5 code replacements. They will look like code, so don't be alarmed.
- Open up any one of the Tangled site pages in Design view to confirm that the copyright symbol is in the right place and looks as it should now:
- Close any open pages.
Find and Replace... exchanging (and adding) sections of HTML code
Probably the most powerful use of Find and Replace... is to swap out sections of HTML code, or, in this case, add sections of HTML code. Our goal here is to add div tags around images in the tangled-gallery.html page to create columns, and to resize all the image tags in bulk. This will require multiple uses of Find and Replace... -- be VERY careful with your typing when you do this. (Because we're only working with one page, we'll be able to Undo this time fortunately.)
Instructor Note:
What we are going to do below is just for demonstration purpose of showing you how powerful Dreamweaver Tool is. You should not use this method to resize your images in your website, because it will caused your page to load very slow and the file size will be huge. You must resize and optimize your images before inserting them into Dreamweaver using graphic editing program, such as Photoshop.
- Open the tangled-gallery.html page. Look at in Design view, first.
- Notice that there are 30 images on this page of different sizes. They are all width and height equivalent, so resizing them to a standard size (250x250) will work so that they retain their proportions. All the images are one of the following sizes:
- 250x250 (our target size)
- 300x300
- 400x400
- 500x500
- Look at the page in Code view. Notice that all image tags in the div#gallery have a similar code construction.
- Make the same selection that you see here in the image below (the highlighted first part of the img tag on line 28) and copy it -- we'll paste it into the Find: box shortly.
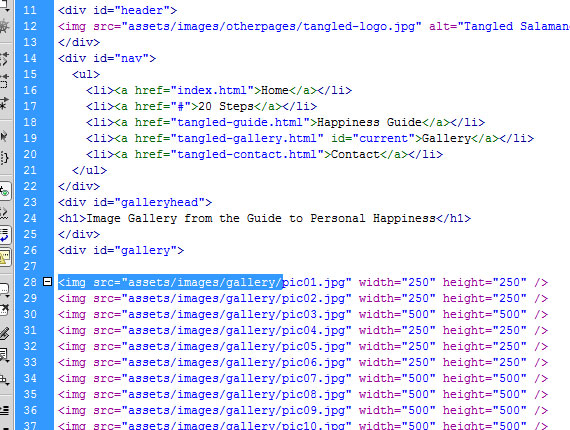
- None of these images are contained within divs, so we'll start by finding and replacing the img tags and wrap divs around them. Then we'll move on to finding and replacing image sizes. Do the following Find and Replace... in the order you see them in the table below, one at a time. ALL the Find and Replace... are with this document only and with Source Code. It is likely easier to stay in Code view while you do this, otherwise the selection could change to Text instead.

| Find: | Replace: | Purpose and Notes |
|---|---|---|
| <img src="assets/images/gallery/ | <div><img src="assets/images/gallery/ | As always with Find and Replace... the EXACT text must be used. If you are copying and pasting from this table, do NOT make any stray selections (such as extra spaces or words that are in adjacent table cells). This is a div opening tag addition to the code. We could just type "<img" in the Find: box, but that would include the Tangled Salamanders logo at the top of the page (line 12 in the code view excerpt above). By copying the first part of all the img tags from the code that are in the gallery subfolder, we'll avoid changing any other images on the page that don't reside in that folder (like the logo). Also, this is just the opening part of the div we are adding. We'll close it last. When you Replace All, you should see the results of 30 replacements made. If you don't, then you made a typo. |
| width="500" | width="250" | This is a width reduction to each image that is 500x500. There will be 9 replacements. |
| width="400" | width="250" | Another width reduction. There will be 9 replacements. |
| width="300" | width="250" | This is the last width reduction. There will be 7 replacements. |
| height="500" | height="250" | This is a height reduction to each image that is now 250x500 9 replacements. |
| height="400" | height="250" | Another height reduction. 9 replacements. |
| height="300" | height="250" | This is the last height reduction. 7 replacements. |
| height="250" /> | height="250" /></div> | This is the div closing tag addition to the code. You may be thinking, why did we include the height in the Find? Couldn't we have just included the image tag's unusual close, or the "/>" -- wouldn't that be enough? Although the img tag is a rare one (it's an empty tag so has that unusual close -- the slash "/" -- inside the one and only tag) there are four other empty tags with that type of internal close (hr, br, link and meta). We do have a meta and link tag on the page, so "/>" isn't enough. We also have an image tag (the logo) that isn't part of the gallery. So the height="250" will help us avoid catching the logo image, too. 30 replacements. |
- If you followed the list above precisely, your code should look exactly like this for the div#gallery section of images:
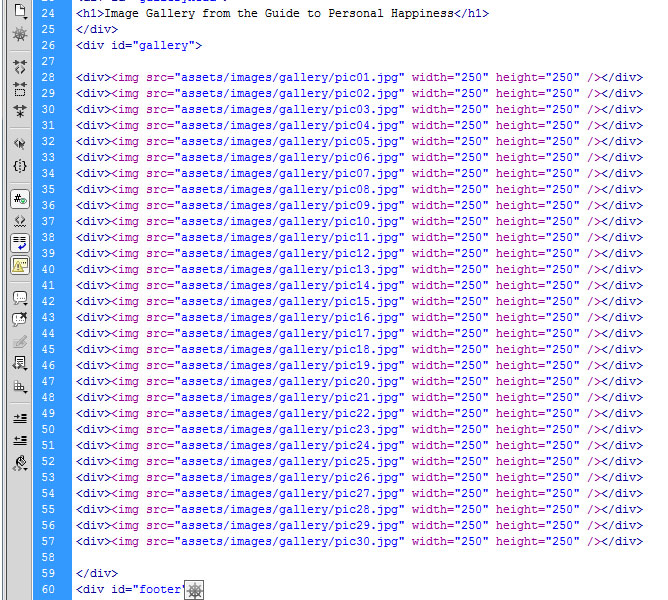
- If your code doesn't look like this above, then you may have to fix this the hard way -- re-type one line at a time... ouch! -- which is exactly what Find and Replace... is there to avoid.
- The final touch to really make all this Finding and Replacing worth it, is to do something with -- style! -- all the div tags you just added.
- In the CSS, add the following descendant selector -- you'll make the choice Compound in Dreamweaver to do this:
- #gallery div -- give it a float of left, and margin right of 40px and margin bottom of 40px (right and bottom margin only).
Instructor Note:
This descendant (in Dreamweaver make the selection Compound) selector
#gallery div
styles all the div tags nested within the div#gallery and makes them do the same thing. Remember, you just added 30 of them in there, so this really is a major style you're adding now, and more amazing that it's done with only one selector.
Be careful! There should be a space between #gallery and div in the selector name.
- #gallery div -- give it a float of left, and margin right of 40px and margin bottom of 40px (right and bottom margin only).
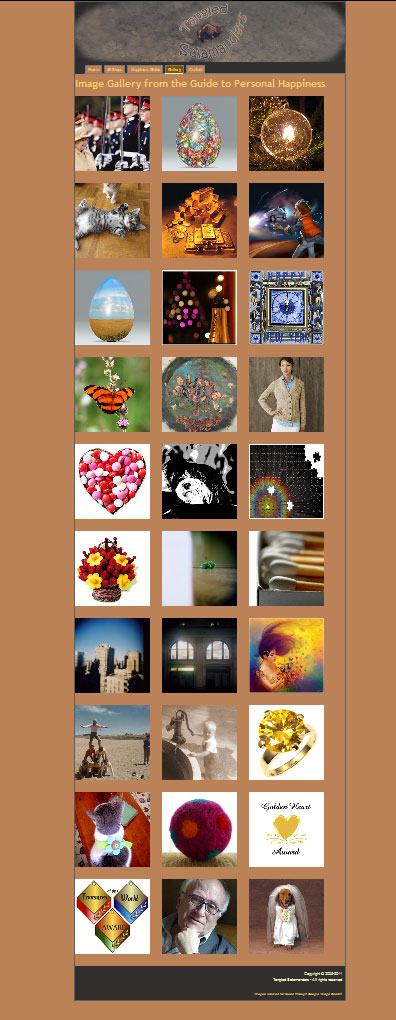
- Save this page and preview it in a browser.
- When you preview this page in a browser, you should see that all the images are now the same size, and they are all spread apart the same distance, forming a kind of table. Considering where this one started, the change is very dramatic! This is the entire page, zoomed WAY out, as it looks in Firefox:
Part 6 -- Resample Images
Bear in mind, on the tangled-gallery.html page, we just gave all these images height and width in HTML attributes to make their size appear smaller, but the actual size of some of these images are very large -- some are 500x500 and their file size is larger as well. Notice, in the Files panel (as shown in the picture below), pic03.jpg is a 500x500 image and has a file size of 253KB. The image above it, pic02.jpg, a 250x250 image, is only 17KB.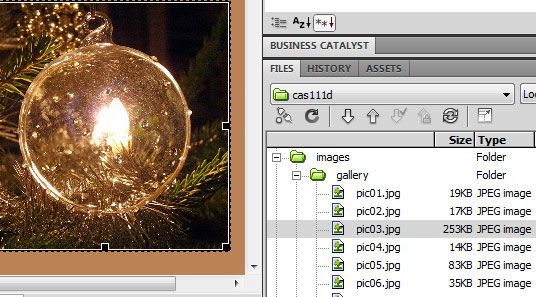
Instructor Note:
Again, you should not use this method to resize your images in your website, DO NOT use this method in your final website, because it will caused your page to load very slow and the file size will be huge. You must resize and optimize your images before inserting them into Dreamweaver using graphic editing program, such as Photoshop.
The consequence of having images that are larger than the area we want them in (250x250) is that they will take longer to load into Web browsers. Since we have such a large number of images on this page, the load time will be noticeably higher, particularly on computers with slower Internet connections.
To actually create an image gallery like this, images should be resampled, which means to reduce (downsample) or increase (upsample) the number of pixels in an image for the purpose of reducing or enlarging its dimensions (width and height) and/or reducing or enlarging its overall file size. This will likely affect the image resolution -- in other words, downsampled images will either be smaller (width and height) versions of their original image or they will be lower resolution versions of their original image.
Our goal here is to downsample the larger images to the 250x250 size. You can resample images in a program like Photoshop to the exact dimensions for use on the Web page and you have several options for how you can resample. This is covered in greater detail in CAS 208, Beginning Photoshop for the Web.
Fortunately, Dreamweaver has a built-in resample image feature that is efficient and easy to use.
- Open tangled-gallery.html if it isn't already.
- Switch to Design view if you aren't there already.
- One at a time, click each image (in Design view, not in the Files panel) and look for the Resample image button (as shown below) on the Properties panel.
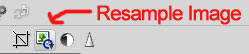
- If that Resample button is active (clickable) it means the image can be resampled. If not, then the image is already the correct width and height. For pic01.jpg and pic02.jpg, they are already 250x250. For pic03.jpg, it can be resampled (downsampled from 500x500 to 250x250).
Instructor Note:
Warning! Resampling images with this Dreamweaver feature will permanently reduce the size of the image and likely the quality of the image as well. While this is useful for the image to display on the Web page properly, if you want a larger version of this image for use later, be sure you are only working with a copy of the image and not the original source image you plan to use later. Of course, for the purpose of this assignment, permanent changes are expected and acceptable. - With pic03.jpg selected (in Design view, not in the Files panel), click the Resample button. You will be warned that this is going to permanently change this image (i.e., make it smaller in this case).
- Click Ok if prompted.
- Notice that, in the Files panel, the file size of pic03.jpg should be substantially lower than it was previously. (Click the Refresh button in the Files panel if the KB number hasn't automatically changed after a few seconds.)
- Continue this process by clicking on all 30 images, one after another, and resample them if applicable.
Part 7 -- Finishing Steps
- Save and upload the entire cal4 folder and all its pages and assets to the SWS.
- View the Web page through a browser on the SWS.
- Mail it to your instructor using a subject like CAS 111d Calisthenics 4 Uploaded Your Name
Instructor Note:
As you should be in the habit of doing, be sure to use a browser (or more than one browser) to check your Web pages on the SWS to ensure everything works properly.